Page History
Review the Additional Information for using Salesforce Connector.
On this page:
| Table of Contents |
|---|
| Anchor | ||||
|---|---|---|---|---|
|
Salesforce Security Token
You are given a security token the first time you log into Salesforce. Don't know your security token?
To reset it:
- Click on your username in the top right section
- Choose "My Settings" from the menu
- Click "Personal"
- Click "Reset your security token" and follow the steps provided
This steps will send to your user email the info with the "Security Token" like:
Salesforce WSDL
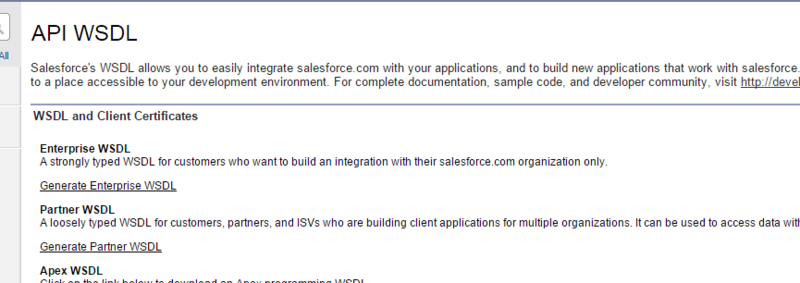
The follow steps will provide you the information to get the Enterprise WSDL and generate the necessary jar file for the connector
To get the Enterprise WSDL file, please follow the next steps:
- Click on Setup in the top right section.
- Click on Build/Develop in the left menu.
- Click "API".
- Download the Enterprise WSDL in "Generate Enterprise WSDL".
For complete documentation, sample code, and developer community, visit Salesforce Developer.
To generate the Enterprise Jar file, please follow the next steps:
- Generate and download WSDLs.
- Download the last version of force-wsc JAR. (link here)
- Download the last version of stringtemplate JAR. (link here)
- Download the last version of antlr-runtime JAR. (link here)
- Generate Jar file using this instruction:
| Info |
|---|
java -classpath force-wsc-XXX.jar;stringtemplate-XXX.jar;antlr-runtime-XXX.jar com.sforce.ws.tools.wsdlc enterprise.wsdl enterprise.jar |
Salesforce Chatter App
The follow steps will provide you the information to create the necessary Chatter App.
In your Sales Force Server, go to the Setup page
Go to Build / Create / Apps
In this new page, click on New Connected Apps
Fill the Basic Information:
- Connected App Name
- API Name
- Contact Email
In the API (Enable OAuth Settings):
- Check "Enable OAuth Settings"
- Set the "Callback Url"
- Select the "Selected OAuth Scopes"
- Save the application
- In the next screen you can copy the "Consumer Key" and the "Consumer Secret" information.
Salesforce Consumer Key and Consumer Secret
Once you created your "Connected App" you can get the "Consumer Key" if you go to Setup / Build / Create / Apps and select your connected app.
- Copy the "Consumer Key"
- To get the "Consumer Secret" click in "Click to reveal"
Salesforce sQueries File
This document represents the data retrieved from Salesforce using SOQL, please modify this document only if you know the available fields and types of the sObject you want to modified, and you know how to use SOQL.
Each sObject tag represents a element type inside Salesforce, following the structure of this sObjects will be explain (please use the API Name for every field, you can check it in the setup/customize/<item>/fields section in Salesforce).
| Info |
|---|
## Attributes ##

For each sObject it can be up to three attributes:

	* @type = Name of the a specific element type inside Saleforce (Not Optional)
	* @attachment = Boolean flag which indicates if this element type can have attachments. If not specified the default is false (Optional)
	* @nested = Boolean flag which indicates if this sObject has nested subfields for the specified references. If not specified the default is false (Optional)

## Children ##

Each sObject can have up to two children:

	* fields =  These are the fields that will be retrieved by the connector
	* nested = Indicates the fields to retrieve for a reference (all the fields that ends with "Id" e.g ParentId)

## Nested ##

To uses nested subfields you put subFields(<{name-of-the-reference}>) at the end of the fields inside fields tag

Inside the nested you put a tag with the name of the reference () and the reference's fields in this way:

	<name-of-the-reference>{name-of-the-reference}.Field1, {name-of-the-reference}.Field2, ...</name-of-the-reference>

In the case the reference can be map to many types you can do:

	<name-of-the-reference>
		TYPEOF {name-of-the-reference}
			WHEN {Type1} THEN Field1, Field2, ...
			WHEN {Type2} THEN FieldA
			WHEN {Type3} THEN FieldX1
		ELSE FieldDefault
		END
</name-of-the-reference> |
| Note |
|---|
NOTES:
|
Getting Knowledge Article Specific Info
You can crawl the KA (knowledge article) info in two ways:
- Generic: This one will crawl only the standard fields of the KA.
- Specific: This one will crawl all the custom fields for KA (you need to edit the sQueries file and add one for the specific KA type and fields).
Example: Do you want to add a new type for Offer KA type with custom fields myMail and lastAddress, use as base the query for KnowledgeArticleVersion:
| Info |
|---|
	<sObject type="KnowledgeArticleVersion" nested="true">
		<fields>Id, KnowledgeArticleId, OwnerId, IsDeleted, PublishStatus, VersionNumber, IsLatestVersion, ... , LastPublishedDate, SourceId, ArticleType</fields>
	</sObject>

	<sObject type="Offer__kav" nested="true">
		<fields>Id, KnowledgeArticleId, OwnerId, IsDeleted, PublishStatus, VersionNumber, IsLatestVersion, ... , LastPublishedDate, SourceId, ArticleType, myMail__c, lastAddress__c</fields>
</sObject> |


