Page History
Aspire in 40 minutes using the distribution archetypeMake sure
Installing Java and Installing the Maven Command Line
Step 1: Connect to Search Technologies Maven repository
Step 3: Build the distribution
However, here
6
startup
is a
a
that
Use the Aspire
User Interface
http
http
http
the first thing to check is
etc. Visit:
7

8

Step 9
| Anchor | ||||
|---|---|---|---|---|
|
Now that you have Maven and Java (yay!), let's configure Maven so that it understands where the Search Technologies Maven Repository is located. This is the location on the internet where all of the Aspire components are located. The URL is http://repository.searchtechnologies.com/artifactory/simple/community-public/. It is password protected.
If you have already completed this step, please go to Step 2.
| Note |
|---|
Use your registered user name and password to access the Maven repository. Go to Registration for more information. |
After Maven understands where the ST repository is located, Maven can download Aspire and all of its pieces automatically to create new Aspire distributions with a single command.
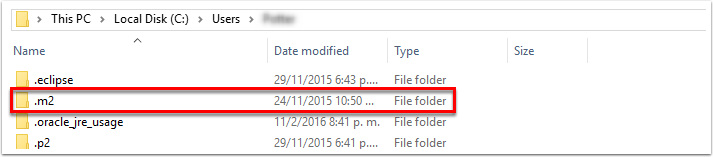
Create the ".m2" directory in your user-name's home directory (if it does not already exist)Anchor Step1 Step1 - This is known as the "Maven Local Repository"
- This is the directory where Maven will store all of the components which it downloads on your local machine.
- Windows XP: C:\Documents and Settings\{username}\.m2
- Windows 7: C:\Users\{username}\.m2
- Note: Windows 7 may prevent you from creating this directory. It will say "You must type a file name. If so, create the directory using command-line tools.
- Open up a new DOS command-shell and go to Start, enter "cmd" in the Run or Search for Programs field, and then execute the cmd.exe program.
If necessary, use "cd" to change directory to your user's home directory (C:\Users\{username} directory).
- Open up a new DOS command-shell and go to Start, enter "cmd" in the Run or Search for Programs field, and then execute the cmd.exe program.
- Enter the following, then press Enter: mkdir .m2
- Create the settings.xml file inside your new .m2 directory
- Register to get a username and password to access the repository.
A default settings.xml file is installed with Maven and can be found in the conf directory file. For example, C:\dev\apache-maven-3.3.9. - Locate it and copy the file.
- Navigate to your .m2 directory and paste the file.
- Open the file in any editing software.
- Go
- to Connect to Search Technologies Maven Repository and copy the settings.xml content on the page (starting with <?xml and ending with </settings>).
- Paste it into your settings.xml file.
- Replace REGISTERED-USERNAME and REGISTERED-PASSWORD with your registration data.
- Save the changes and close the file.
These steps will create a settings.xml file that will apply to the current user on the machine. - To apply the settings to all users who will log onto the machine,
Anchor MavenRep MavenRep
Step 2: Use Maven to create a new Aspire distribution
| MavenRep | |
| MavenRep |
For more detailed documentation for creating new distributions, see see Using The the Maven Distribution Archetype
Now that Maven is installed, you can create a new Aspire distribution easilyy. Our recommendations are to:
- Open a DOS command window. (See See Step 1 for for instructions.)
- Use cd to change the directory to a place where you want to store the new Aspire distributions.
Execute the command shown below.Anchor Command Command
| Code Block | ||||
|---|---|---|---|---|
| ||||
mvn archetype:generate -DarchetypeGroupId=com.searchtechnologies.aspire -DarchetypeArtifactId=aspire-distribution-archetype -DarchetypeVersion=3.2 -DrepositoryId=stPublic |
The command should be executed exactly as is. Do not modify the parameters; they specify where to locate the instructions for how to build a new Aspire Distribution.
Note: Sometimes Sometimes the mvn command will fail to locate the Search Technologies repository. (It should be specified in your new settings.xml file.) If this is a problem, add the following argument to the mvn command mvn command from above:
| Code Block | ||||
|---|---|---|---|---|
| ||||
-DarchetypeRepository=httphttps://repository.searchtechnologies.com/artifactory/public |
After executing the command, Maven will download a bunch of different JAR files. Most of these are various Maven plug-ins that Maven requires. These plug-ins are downloaded automatically from the "master maven repository in the sky", namely http://repo.maven.apache.org.
Finally, after Maven is ready to go, you will be prompted for the following information:
- groupId - This is the name of the organizational unit to which your distribution belongs. It's usually the same as your organization's domain, but in reverse order (for example, "com.searchtechnologies.aspire"). If the distribution belongs to a customer, you should use that customer's groupId.
- The purpose of the groupId is to distinguish this distribution from all other maven distributions built by other organizations throughout the world (just in case somebody somewhere wants to re-use your distribution someday).
- artifactId - This is the name for your distribution. Technically, it should be unique name across all distributions (or any other maven project) within the organization specified by groupId. Again, it's purpose is to uniquely identify your distribution within your organization.
- version - This will be the version number for this distribution.
- I usually use "0.1-SNAPSHOT".
- I say "0.1" to not be presumptuous. In other words, projects that are just starting out should start at 0.1, until they get tested and used at least a little bit.
- The "-SNAPSHOT" is a Maven standard which means that this is a project which is currently in development. It can be removed once the project is officially "released".
- mavenPassword - This will be the Maven password you got when you registered.
- mavenUsername - - This will be the Maven username which you got when you registered.
- mongoDBServer: - (localhost:27017) This will be the Maven username which you got when you registeredthe url to the mongoDB Server.
After you enter the final information and press press Enter, you are prompted to confirm the entered information. Enter Enter Y and and Enter again again.
Example output:
| Code Block | ||||
|---|---|---|---|---|
| ||||
>mvn archetype:generate -DarchetypeGroupId=com.searchtechnologies.aspire -DarchetypeArtifactId=aspire-distribution-archetype -DarchetypeVersion=3.2 -DrepositoryId=stPublic [INFO] Scanning for projects... [INFO] [INFO] ------------------------------------------------------------------------ [INFO] Building Maven Stub Project (No POM) 1 [INFO] ------------------------------------------------------------------------ [INFO] [INFO] >>> maven-archetype-plugin:2.4:generate (default-cli) > generate-sources @ standalone-pom >>> . . . Define value for property 'groupId': : com.searchtechnologies Define value for property 'artifactId': : aspire-demo Define value for property 'version': 1.0-SNAPSHOT: : 0.1-SNAPSHOT [INFO] Using property: package = pom [INFO] Using property: aspireAdminPort = 50505 Define value for property 'mavenPassword': : xxx Define value for property 'mavenUser': : [email protected] Confirm properties configuration: groupId: com.searchtechnologies artifactId: aspire-demo version: 0.1-SNAPSHOT package: pom aspireAdminPort: 50505 defaultMongo: localhost:27017 mavenPassword: xxx mavenUser: [email protected] mongoDBServer: localhost:27017 Y: : y [INFO] ---------------------------------------------------------------------------- [INFO] Using following parameters for creating project from Archetype: aspire-distribution-archetype:3.2 [INFO] ---------------------------------------------------------------------------- [INFO] Parameter: groupId, Value: com.searchtechnologies [INFO] Parameter: artifactId, Value: aspire-demo [INFO] Parameter: version, Value: 0.1-SNAPSHOT [INFO] Parameter: package, Value: pom [INFO] Parameter: packageInPathFormat, Value: pom [INFO] Parameter: mongoDBServer, Value: localhost:27017 [INFO] Parameter: version aspireAdminPort, Value: 50505 [INFO] Parameter: groupId, Value: 0com.1-SNAPSHOTsearchtechnologies [INFO] Parameter: packageversion, Value: pom0.1-SNAPSHOT [INFO] Parameter: mavenUserdefaultMongo, Value: [email protected]localhost:27017 [INFO] Parameter: aspireAdminPortpackage, Value: 50505pom [INFO] Parameter: groupIdmavenUser, Value: johndoe@mycompany.com.searchtechnologies [INFO] Parameter: mavenPassword, Value: xxx [INFO] Parameter: artifactId, Value: aspire-demo [INFO] project created from Archetype in dir: C:\Users\AspireDemo\aspire-demo [INFO] ------------------------------------------------------------------------ [INFO] BUILD SUCCESS [INFO] ------------------------------------------------------------------------ [INFO] Total time: 01:19 min [INFO] Finished at: 2016-02-22T00:29:09-06:00 [INFO] Final Memory: 14M/172M [INFO] ------------------------------------------------------------------------ |
| Anchor | ||||
|---|---|---|---|---|
|
So now you can run Aspire, right? Well, actually, there's one more step.
The purpose of the Maven archetype (the the previous step) was to build a Maven distribution project. Essentially, this is a template distribution. Now let's use Maven to build the distribution itself.
The sequence goes like this:
| Code Block | ||
|---|---|---|
| ||
Aspire Distribution Archetype --mvn--> Aspire Distribution Project --mvn--> Aspire Distribution |
Why is it so complicated?
Well, Aspire is meant for industrial-strength production installations. It is not a toy system. This means:
- There needs to be a solid, repeatable method for building deployments.
- The same distribution will likely need to be built for multiple environments:
- Development
- Quality Assurance
- Staging
- Production
The Maven Distribution Project amply fulfills these needs. It provides a template for building copies of your distribution. Maven "profiles" can be used to customize the template for different environments, specifying different server addresses and database names for the Development environment vs the Staging environment, for example.
BuildingBuild the Aspire distribution
Okay, so let's actually build our Aspire distribution. Fortunately, this is very easy.
- Change your working directory into your Maven distribution project. This is the same as what you entered for the artifactId.
- In the command window, run: mvn clean package
Again, since this is your first time running "mvn package", Maven will download a bunch of plug-ins, which it needs. But after that's done, it will build the Aspire distribution and you're ready to go.
| Code Block | ||||
|---|---|---|---|---|
| ||||
> cd aspire-demo >mvn clean package [INFO] Scanning for projects... [INFO] [INFO] ------------------------------------------------------------------------ [INFO] Building Aspire Distribution Project 0.1-SNAPSHOT [INFO] ------------------------------------------------------------------------ Downloading: httphttps://repository.searchtechnologies.com/artifactory/public/com/searchtechnologies/aspire/aspire-bootloader/3.2/maven-metadata.xml . . . [INFO] Reading assembly descriptor: distribution.xml [WARNING] Cannot include project artifact: com.searchtechnologies:aspire-demo:jar:0.1-SNAPSHOT; it doesn't have an associated file or directory. [WARNING] Cannot include project artifact: com.searchtechnologies:aspire-demo:jar:0.1-SNAPSHOT; it doesn't have an associated file or directory. [WARNING] The following patterns were never triggered in this artifact exclusion filter: o 'com.searchtechnologies:aspire-demo:jar:0.1-SNAPSHOT' [WARNING] Cannot include project artifact: com.searchtechnologies:aspire-demo:jar:0.1-SNAPSHOT; it doesn't have an associated file or directory. [WARNING] Cannot include project artifact: com.searchtechnologies:aspire-demo:jar:0.1-SNAPSHOT; it doesn't have an associated file or directory. [INFO] Copying files to C:\Users\AspireDemo\aspire-demo\target\aspire-demo-0.1-SNAPSHOT-distribution [WARNING] Assembly file: C:\Users\AspireDemo\aspire-demo\target\aspire-demo-0.1-SNAPSHOT-distribution is not a regular file (it may be a directory). It cannot be attached to the project build for installation or deployment. [INFO] ------------------------------------------------------------------------ [INFO] BUILD SUCCESS [INFO] ------------------------------------------------------------------------ [INFO] Total time: 7.855 s [INFO] Finished at: 2016-02-22T00:37:05-06:00 [INFO] Final Memory: 14M/168M [INFO] ------------------------------------------------------------------------ |
| Anchor | ||||
|---|---|---|---|---|
|
Messages that appear when building the distribution (optionally)
There are a number of warning message you may see when building the distribution. Don't let this worry you. Basically, if you see the following message, everything worked.
| Code Block | ||||
|---|---|---|---|---|
| ||||
[INFO] ------------------------------------------------------------------------ [INFO] BUILD SUCCESS [INFO] ------------------------------------------------------------------------ |
There's an explanation for warnings you may see
.This warning refers to the fact we don’t "hard code" the encoding for the ascii ASCII files we use. We tried to do this in the very early stages and it gave us more problems than it fixed. This shouldn’t cause any issues as long as you’re not working in any languages a language that use uses extended character sets.
| Code Block | ||||
|---|---|---|---|---|
| ||||
[WARNING] Using platform encoding (MacRoman actually) to copy filtered resources, i.e. build is platform dependent! |
We recently changed the build process so that you could include dependencies in the pom file to cause “application bundles” to be copied from Maven in to the target bundles/aspire directory at build time. This allows Aspire to use those application bundles on hosts which that do not have no internet access. You've always been able to do that with component bundles. The message below tells you that you’ve not got any you have no dependencies with the group id com.searchtechnologies.appbundles.
| Code Block | ||||
|---|---|---|---|---|
| ||||
[WARNING] The following patterns were never triggered in this artifact inclusion filter: o 'com.searchtechnologies.appbundles:*' |
Some versions of Maven's mvn command (mainly 2.x) produce an unwanted file and copy it to the target bundles/aspire directory . This warning indicates that your version didn’t did not (as this line warns you the file is not being excluded when things are being copied to the target directory).
| Code Block | ||||
|---|---|---|---|---|
| ||||
[WARNING] The following patterns were never triggered in this artifact exclusion filter: o 'com.searchtools:aspire-demo:jar:0.3-SNAPSHOT' |
This warning just refers to the fact that the build is copying to a directory and therefore can not cannot produce something that can be place placed back in a Maven repository.
| Code Block | ||||
|---|---|---|---|---|
| ||||
[WARNING] Assembly file: /Users/st/aspire-test-3/aspire-demo/target/aspire-demo-0.3-SNAPSHOT-distribution is not a regular file (it may be a directory). It cannot be attached to the project build for installation or deployment. |
mvn install
In Maven 2.x, you can get away with running the following command to build the distribution:
| Code Block | ||||
|---|---|---|---|---|
| ||||
mvn install |
In Maven 3.x, you You can't run this command to build a distribution, so make sure you use mvn package as (as detailed above) instead. If you do use install, the build will fail and you'll see the following :message.
| Code Block | ||||
|---|---|---|---|---|
| ||||
[ERROR] Failed to execute goal org.apache.maven.plugins:maven-install-plugin:2.3.1:install (default-install) on project test-project: The packaging for this project did not assign a file to the build artifact -> [Help 1] [ERROR] [ERROR] To see the full stack trace of the errors, re-run Maven with the -e switch. [ERROR] Re-run Maven using the -X switch to enable full debug logging. [ERROR] [ERROR] For more information about the errors and possible solutions, please read the following articles: [ERROR] [Help 1] http://cwiki.apache.org/confluence/display/MAVEN/MojoExecutionException |
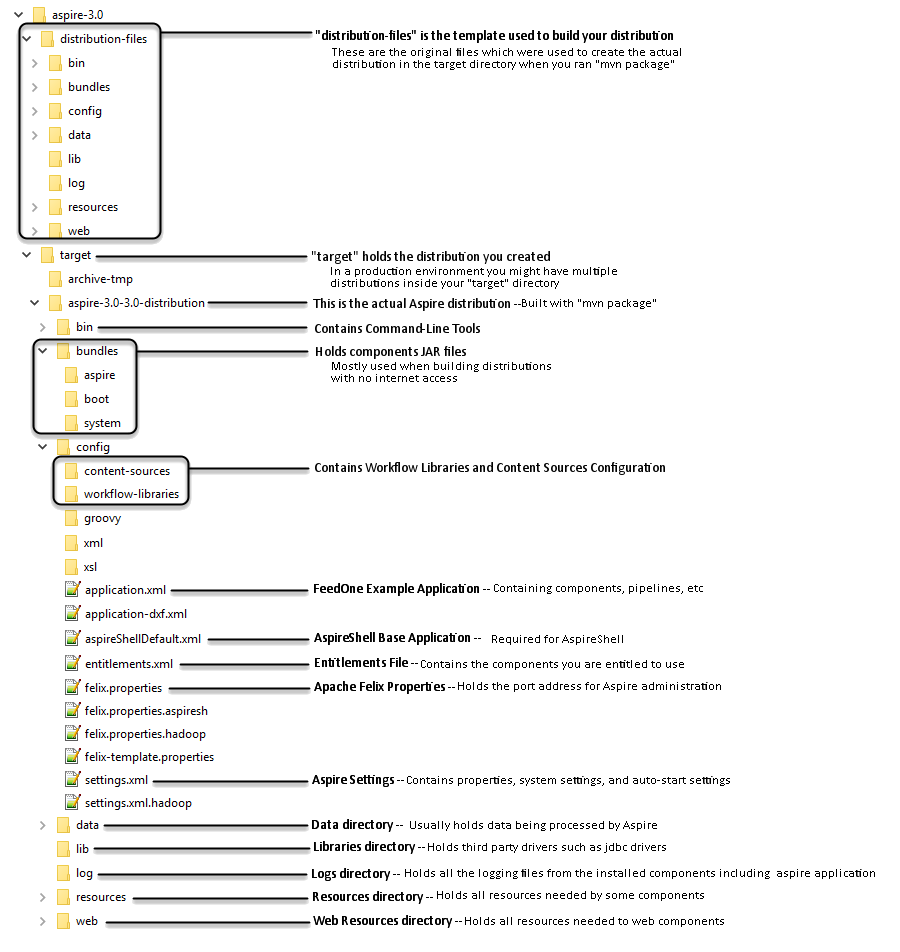
What do we have?
The following diagram shows the directory structure you have created within your Maven distribution project so far:
Anchor launchDist launchDist
Step
6| launchDist | |
| launchDist |
4: Launch default distribution
The default Aspire distribution is a fully functional version of Aspire. Let's launch Aspire.
1. In the command window, change your working directory to: target\aspire-demo-0.1-SNAPSHOT-distribution
2. Run: bin\
startupaspire.bat
| Excerpt | ||
|---|---|---|
|
|
|
|
|
Here is example
Example output:
|
At this point, you can use
3. Use the standard administration interface (http://localhost:50505) to install pre-packaged applications such as connectors and search engine publishers.
|
Errors4. If you see an error like this:
|
|
|
and Aspire exits:
|
5. Check that you have the correct username and password in the config/settings.xml file. See General Settings for details. |
More InformationFor more information on how to start, stop, install as service, |
see Launch Control |
Anchor launchExample launchExample
Step
7| launchExample | |
| launchExample |
5: Launch the Example application.xml
Filefile

A simple application.xml file is provided with your application. Let's go to the debug interface and start it up to see what it does.
- Point your web browser to http://localhost:50505/aspire (the debug interface).
- Where it says "Load a new Application", enter "config/application.xml"
- Then click "start"
This will start up the sample application. Aspire will take a minute or two to launch the first time because (just like Maven) Aspire will automatically download components from the Search Technologies Maven Repository. These are stored in the Maven local repository (the .m2 directory) just like Maven does.
4. You should see something that looks like this:
| Code Block | ||||
|---|---|---|---|---|
| ||||
> cd target\aspire-demo-0.1-SNAPSHOT-distribution > bin\startupaspire.bat Removing Felix-Cache and AppBundle-Cache directories Java HotSpot(TM) 64-Bit Server VM warning: ignoring option MaxPermSize=256m; support was removed in 8.0 2016-02-22 00:42:43.916:INFO::FelixStartLevel: Logging initialized @1980ms 2016-02-22 00:42:44.010:INFO:oejs.Server:FelixStartLevel: jetty-9.2.12.v20150709 2016-02-22 00:42:44.162:INFO:oejsh.ContextHandler:FelixStartLevel: Started o.e.j.s.ServletContextHandler@5f98816f{/,null,AVAILABLE} 2016-02-22 00:42:44.173:INFO:oejs.Server:FelixStartLevel: Started @2237ms 2016-02-22 00:42:44.441:INFO:oejs.ServerConnector:FelixStartLevel: Started ServerConnector@3de207d8{HTTP/1.1}{0.0.0.0:50505} ************************************************************************ * * ASPIRE BOOTLOADER * * Bundle id : 13 * * Location : file:bundles/boot/aspire-bootloader-3.2.jar * 2016-02-22T06:42:46Z INFO [BOOTLOADER]: Maven repository: stPublic - httphttps://repository.searchtechnologies.com/artifactory/public/ 2016-02-22T06:42:46Z INFO [BOOTLOADER]: Maven local repository: C:\Users\Potter/.m2/repository 2016-02-22T06:42:46Z INFO [BOOTLOADER]: Maven update policy: always 2016-02-22T06:42:46Z INFO [BOOTLOADER]: Default version: 3.2 2016-02-22T06:42:46Z INFO [BOOTLOADER]: Fetching: com.searchtechnologies.aspire:aspire-application:3.2 . . . Starting bundle: 13 - file:/C:/Users/.m2/repository/com/searchtechnologies/aspire/aspire-extract-domain/3.2/aspire-extract-domain-3.2.jar Started component factory: aspire-extract-domain (bundle 13) Registering component: /FeedOneExample/StandardPipeManager/ExtractDomain Registering component: /FeedOneExample/StandardPipeManager/PrintToFile AUTOSTART: Complete |
AUTOSTART: Complete |
5. After the sample application is started, you can return to the debug console: http://localhost:50505/aspire
The debug-console provides status information and some low-level admin controls for Aspire. Through the debug console you can:
- Load New Applications
- Each aspire application will be an application.xml file which has components and pipelines for processing content.
- Multiple configurations can be loaded into the same instance of Aspire.
- For example, you can have a separate configuration for each database that you want to process with Aspire.
- Refresh Applications
- This will reload the application.xml file for a configuration, loading all new configuration settings and automatically loading components as needed
- Browse Applications
- Every component in an Aspire Application Configuration has a separate web page within the Aspire home page.
- Component Status / Component Controls
- Many of the components will use the debug console to display additional status about the component or to allow for administrator control over the component (reloading XSL transforms, etc.)
- For example, you can turn on statistics for pipeline managers to see which pipeline stages are the slowest.
- Update Components
- Not only can component configurations be updated, but the binary Java code for individual components can be updated as well. Click on "Check For Updates". If a new version of a component is available from the Maven Repository, you will be given the option to update the component.
- This is possible because Aspire is built on top of OSGi, which allows for Jar files to be dynamically reloaded as needed. The entire Aspire system has been built to allow for dynamic component updates.
- View the OSGi Web Console
- The OSGi web console allows you to interact with Apache Felix directly. The username/password is "admin/admin".
- View the Health of the System
- Clicking on the "Health" Bar will show you detailed health about the system.
- Note that health checks need to be configured in the system, and are not turned on by default (other than the application startup health)
So you can see, the debug console contains quite a lot of useful functionality. Spend some time exploring it before going on to the next (and final) step.
Anchor processURL processURL
Step
8| processURL | |
| processURL |
6: Process a URL
Let's process a URL with the default pipeline.
- Go back to the home page: http://localhost:50505/aspire
- Click on the "/FeedOneExample" Component Manager.
- Click on the "FeedOne" sub component.
- NOTE: As an alternative, you can jump directly to the FeedOne component by clicking here:http://localhost:50505/aspire/FeedOneExample/FeedOne/
- Enter "http://www.searchtechnologies.com" where it says "URL to Feed:" and then click on the "feed" button.
- NoteNOTE: Do not press your RETURN or ENTER key.
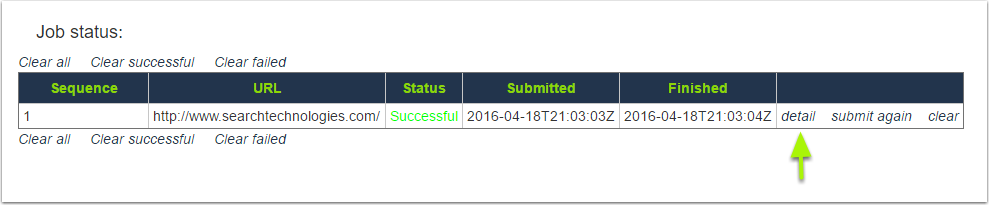
After
clicking on "clicking feed
", you should see the "Job status" table that indicates your job has been submitted to the Aspire pipeline.

The steps above submit a URL down the default pipeline, which will:
- Fetch the URL from the remote web server
- Extract text content from the HTML page
- Extract the domain name from the host name
So, the pipeline doesn't actually send the document to a search engine to index it, but it certainly could. That would only take adding one additional stage to the pipeline.
The job should take only a small fraction of a second to process. You can see that it's done (and that everything worked correctly) by refreshing the page. If it was successful, you should see "Successful" in neon green text.
You can click on the "detail" link in the job status to see the results of the pipeline. What you should see (you may need to scroll down a bit) is an XML representation of Aspire's internal document structure, which contains the result of all document processing. It will contain a <content> tag which contains the text content (from the text extraction component), http headers and web server information (from communicating with the web server
atat searchtechnologies.com), the <content> (added by the text extractor), and the <domainName> (extracted from the host name of the URL).
Anchor nextSteps nextSteps
Step 7
Step 9| nextSteps | |
| nextSteps |
: Congratulations!! And
Where to Go From Herewhere to go from here?
Congratulations! You have built a brand-new distribution of Aspire from scratch using the distribution archetype, and you launched the default Aspire installation and processed a URL. Cool!
Here are some suggestions on what to do next:
- Explore your distribution. Especially look into the config directory and read the "settings.xml" and "application.xml" files.
- For more information on the settings.xml file, go here: General Settings
- For more information on the application.xml file, go here: Application Configuration.
- Try adding a Groovy Scripting stage to your component.
- Groovy scripting allows you to print / read / modify the metadata for documents processed by Aspire. It is the most common way to add custom processing to an Aspire pipeline.
- More information on Groovy Scripting with Aspire can be found here: Using Groovy
- Note that you'll need to add your new Groovy Scripting component to your Aspire pipeline. See here: Pipeline Manager to learn more about pipelines
For example, the following is a minimal Groovy Scripting component:
| Code Block | ||
|---|---|---|
| ||
 <component name="SampleGroovyScript" subType="default" factoryName="aspire-groovy">
  <config>
    <script>
      <![CDATA[
        println "Hello World!";
        println "The Aspire Document is this: ";
        println doc.toString(/*pretty:*/true);
      ]]>
    </script>
  </config>
</component> |
You can add this component to your default Aspire configuration using the following steps:
- Add the component to your "application.xml" file.
- Put it after the <component name="ExtractDomain"> component
- Then add "SampleGroovyScript" as a stage to your pipeline.
- Put it after <stage component="ExtractDomain" />
- Now reload your configuration
- Do this by going to Aspire debug console home: http://localhost:50505/aspire
- Then click on the circular arrow button next to the "/FeedOneExample" configuration
- Now go back to the FeedOne component and resubmit the http://www.searchtechnologies.com URL to the pipeline (see above).
- Look at the console window where you first ran "startupaspire.bat". You should see "Hello World!" followed by a JSON representation of the Aspire document.
| Info |
|---|
| For more information on the Groovy scripting language, go here http://groovy.codehaus.org/ |
| Info |
|---|
For more information on methods available on the "doc" variable in your Groovy script go to:
|
Overview
Content Tools