In this section, we will review new content management features and how they can help you to manage your set of content sources.
Content Sources
All of the management of Contetn Sources can be done in the Admin UI Content Sources, where we have access to all the management features, and we can see all the content sources in their new presentation. Now each content source card displays more information, so the user can identify more easily which is the content source he is looking for, what is its current state, how many jobs it has crawled and how many errors were produced. Also includes the controls for copy, delete, crawl control, activate and deactivate.

Controls
For the new display of content sources Aspire 2.0 adds new features and information into card like objects that represents each content source, these cards contains several functions to control the content source, the following are all the controls of the card-content source
- Content Source Name & Icon
- The display name of the content source, if the name is to long the name will appear follow by an ellipsis (e.g. ABC...), and if the mouse is over the name, a tooltip will appear with the full name. The Content Source Name is also a link to the configuration of the respective content source.
- The display name of the content source, if the name is to long the name will appear follow by an ellipsis (e.g. ABC...), and if the mouse is over the name, a tooltip will appear with the full name. The Content Source Name is also a link to the configuration of the respective content source.
- Content Source Status
- Indicates the current status of the content source. When the status changes not only does the label change, the color of the content source card changes.
- Indicates the current status of the content source. When the status changes not only does the label change, the color of the content source card changes.
- Time of Crawl
- Indicates the length of time the crawl has been crawling, or how long it took the crawl to finish. In case the content source has never being started the label will be Never Executed. If you put the mouse over the Time of Crawl control, it will show a tool-tip in your local timezone, of the exact date and time the content source was started.
- Indicates the length of time the crawl has been crawling, or how long it took the crawl to finish. In case the content source has never being started the label will be Never Executed. If you put the mouse over the Time of Crawl control, it will show a tool-tip in your local timezone, of the exact date and time the content source was started.
- Jobs Done
Completed jobs shows the total number of successful jobs, you can also click on Complete and open the statistics.
Errors
Errors will show the number of document errors if any; if there is at least one error, you can click on the number and go to the Error Page.
Statistics
It will show all the information available about the current crawl, including crawl type, documents per second, start time, jobs status, etc.
Start Full Crawl
Starts a full crawl, but before that it will show a warning indicating all incremental indexing data will be deleted.
Start Incremental Crawl
Starts an incremental crawl.
Start Test Crawl
- Starts a Test Crawl that will ask how many documents to crawl and how many to skip before it starts to crawl.
- Starts a Test Crawl that will ask how many documents to crawl and how many to skip before it starts to crawl.
Copy
- Creates a new content source with the same configuration.
- Creates a new content source with the same configuration.
Export
- Downloads a zip file with the configuration of the content source that you can use to import it into a different aspire instance.
- Downloads a zip file with the configuration of the content source that you can use to import it into a different aspire instance.
Enable/Disable
- It will enable or disable the content source. (you can only disable the content source if it's status is new, completed, error, failed or canceled)
- It will enable or disable the content source. (you can only disable the content source if it's status is new, completed, error, failed or canceled)
Delete
If you click the delete button a confirmation will appear, if you click OK the delete will proceed and the content source will be deleted.
States
The content sources can be in one of several states, in each state some controls change and some are disabled. In the section above we saw the controls of a content source, in this section we will see which are the controls for each state.
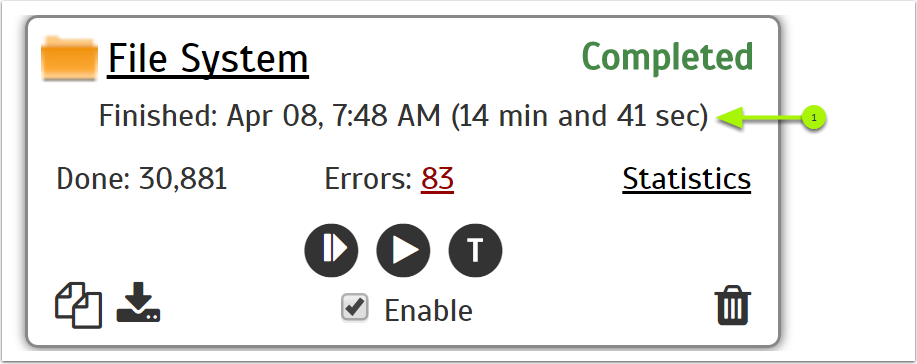
New / Completed / Canceled
The Completed / Canceled status indicates that the crawl or stopping the content source was successful, for these states the Time of Crawl (1) changes to the exact time in your local time zone when the crawl was started and how long it took to reach this state.
Running
The Running status indicates that a crawl is currently in progress, for this state the content source will change color to green, the Time of Crawl changes to the exact time in your local time zone when the crawl was started and with each refresh it will increase the total time that it's been crawling. The Jobs Done number will start to increase and the Errors will show the number of errors at that moment, if any. The Pause and the Stop button will replace the start crawls buttons.

Paused
The Paused status indicates that a crawl is currently paused, for this state the content source will change color to blue, the Time of Crawl will still increase the total time that it's been crawling. The Resume button will replace the Pause button.

Error / Failed / Aborted
The Error status indicates that a crawl finished in an unsuccessful crawl, for these states the content source will change color to red (The Content Source Status will also be a link to see the cause of the unsuccessful crawl), the Time of Crawl will stop updating the total crawl time. The start crawls Buttons will be set again.
The Failed status appears when the content source fails in the initialize phase. The Content Source Status will also be a link to see the reason of the failure
The Aborted status appears when the content source was aborted by the user
Disabled
The Disabled status indicates that a crawl is currently disabled and it will not perform a crawl, for this state the content source will change color to gray, The start crawls buttons will be disabled.

Grouping
A group has the same shape as a content source (card-like), but its content is different, in the image below we have all the controls that a group will have.
Group Name
The display name of the group, if the name is to long the name will appear follow by an ellipsis (e.g. ABC...), and if the mouse is over the name, a tool-tip will appear with the full name. The Group Name is also a link that will expand the content source, so we can see the content source inside it.
Number of Content Sources
The group will display the number of content sources that has contained.
Expand
If clicked, it will expand the content source, so we can see the content source inside it.
Add to Group
If clicked, Add to Group will open the group menu, and put the name of the group so we can only choose the content sources and click on Add Group.
Content Sources Status
Has well as the number of content sources the group will have the status of the content sources and how many content sources inside him has that specific status
Green: Stands for the Running status.
Blue: Stands for the Paused status.
Red: Stands for the three unsuccessful status Error, Failed and Aborted.
Orange: Stands for the three transitory status Pausing, Resuming and Stopping.
White: Stands for the idle status New and Completed and Canceled.
Gray: Stands for the Disabled status.
Ungroup
If clicked, Ungroup will take all the content sources inside the group and put them in the first level (root), and it will delete the group.
Manage a Group
This section walks through the steps necessary to create, use and dispose of a group, and how to interact with the group itself.
Step 1: Select the Content Sources
First of all we need to click on the Group button in the Action Bar, this will open the grouping menu, and change the bottom part of all the content sources into just a checkbox that says Group. Now we can select the content sources we want to group together, once this is done we can put the name of the group in the test field next to the Add Group button.
* Once the group is created, if you want to add another content source to the group, you can do it by click the Add One button ![]() and repeating steps 1 and two
and repeating steps 1 and two
Step 2: Create the Group
Once you have selected the content sources and filled the name, you can click on Add Group, this will fade out and in the content source, and a group card will appear at the end of the content sources. This will be the group you just create with all the selected content sources inside it.
Step 3: Expand the Group
Once we have the group created we can expand it by clicking on the Group Name or by clicking on the expand button ![]() , this will fade out and in the content sources and display only the content sources inside the group. Also a legend will appear in the Action Bar indicating in which group we are in now, right next to the legend is the Return turn button
, this will fade out and in the content sources and display only the content sources inside the group. Also a legend will appear in the Action Bar indicating in which group we are in now, right next to the legend is the Return turn button ![]() , if weclick on it, it will return us to the first level (root).
, if weclick on it, it will return us to the first level (root).
Also while we are in the expanded group we can see that the content source has another button right before the copy button, this button is the Ungroup One button ![]() , it looks exactly as the Return button
, it looks exactly as the Return button ![]() , this button will remove the content source from the group and put it on the first level (root)
, this button will remove the content source from the group and put it on the first level (root)
Step 4: Remove the Group
If you want to remove a group, the only way is to ungroup the entire group by clicking the Ungroup button ![]() , this will move all the content sources from our group to the first level (root) and delete the group.
, this will move all the content sources from our group to the first level (root) and delete the group.


Filtering
In Aspire UI, we can do filtering to the content sources, and we can apply several filters for a more accurate result.
Text Filter (Search)
With this filter, we can do regex searches base on the Content Source Name and the Group Name. To make a search we just put the regex we want in the text field on the top right corner of the Action Bar and press the Enter key. Only the content sources that match the regex will be displays

Cookie Filters
The cookie filters are regular filters that will be saved in a cookie so once we apply a cookie filter, this will be active until we remove it. We can access the cookie filters by clicking on the Filter button ![]() , and when you activate a filter the Filter button will highlight
, and when you activate a filter the Filter button will highlight ![]() .
.
We have three (3) categories of cookie filters, all of then explained below.
General Filters
We have three (3) general filters:
- Active: (Checked by default ) If checked shows all the content sources that are active
- Inactive: (Checked by default) If checked shows all the content sources that are inactive
- Groups: (Checked by default) If checked shows all the groups.

Status Filters
The status filters will all the possible status for the content sources, also it will have the All filter (Checked by default), if any of the status filters is checked, it will unchecked the All filter and only the content sources with the matching checked status will be displayed. If the All filter is checked again, it will unchecked all the status filters.

Connector Filters
The connector filters will be build according to the types of content sources we have available, but it always will have the the All filter (Checked by default), if any of the connector filters is checked, it will unchecked the All filter and only the content sources with the matching checked connector types will be displayed. If the All filter is checked again, it will unchecked all the connector filters.

Time Filters
The time filters can be applied for start and end time of the crawl.
- Start Time: (Unchecked by default) Compares the time given with the start time of the content source, if the time given is after or the exact time of the content source, the content source will be display, if we check the Start Time filter but we don't give a start time, the filter won't be applied. Also if the content source doesn't have a start time, the content source won't be displayed.
- End Time: (Unchecked by default) Compares the time given with the end time of the content source, if the time given is before or the exact time of the content source, the content source will be display, if we check the End Time filter but we don't give a start time, the filter won't be applied. Also if the content source doesn't have a end time, the content source won't be displayed.


Import
In Aspire UI 2.0 we can import a content source zip file and load the content source directly to our management page. For this we just need to click on the Import button in the Action Bar, this will open a browse window where wecan search for our content source zip file, select it and click open. Automatically the content source will be load into the management page.

* The import can only be successful if the zip file contains all four (4) necessary files, and this files are correctly formatted.
** This is functionality is only enable for some browsers, at the moment, please see Browser Compatibility.
Add Source
With Add Source we can choose the type of content source we want to do by choosing the connector. The Add Source menu has three (3) main sections:

- Official Connectors: Is the lost of all the connector created by Search Technologies for Aspire. Just by clicking on the connector we want to use, we will be redirect to the configuration page. The Official connector may change according to your connector entitlements.
- Custom Connectors: It will open a menu to install a custom connector from maven coordinates or a set of config files.
- Refresh: With the Refresh button we can update the list of the connectors available for us.
Custom Connector
By clicking on the Custom Connectors button, we will open a window where we can choose between two methods to install a custom connector, repository and configuration files, both show as toggle buttons on the top of the window.
Repository
The repository method is always the default one, with this option we can download the custom connector from a maven repository. To install the custom connector with need to fill the following fields:
- Group ID: e.g. com.searchtechnologies.aspire
- Artifact ID: The id of the artifact representing the connector e.g. app-custom-connector
- Version: (Optional) If the version of the artifact isn't specify, Aspire will use the same version as it.

* All the connectors added using this method will be added to the Add Source menu.
** It is not recommended to use an older version of a connector is a new version is available.
Configuration Files
Before accessing the configuration file method an alert will be show indicating that the connector added using this method are not going to be included in the Add Source menu.

The configuration files method requires to have both application file and dxf file in the Aspire server. To install a custom connector using this method we just have to specify the direction of the application file.

* If the dxf file doesn't have the new valid format for connectors, it won't be possible to configure the connector.
Loaded Custom Connectors
In case that a custom connector was added without an icon, and alert icon will appear before the connector's name.

If the added custom connector doesn't exist, the alert icon will be appear before the content source name and the icon option will be disabled.

Overview
Content Tools