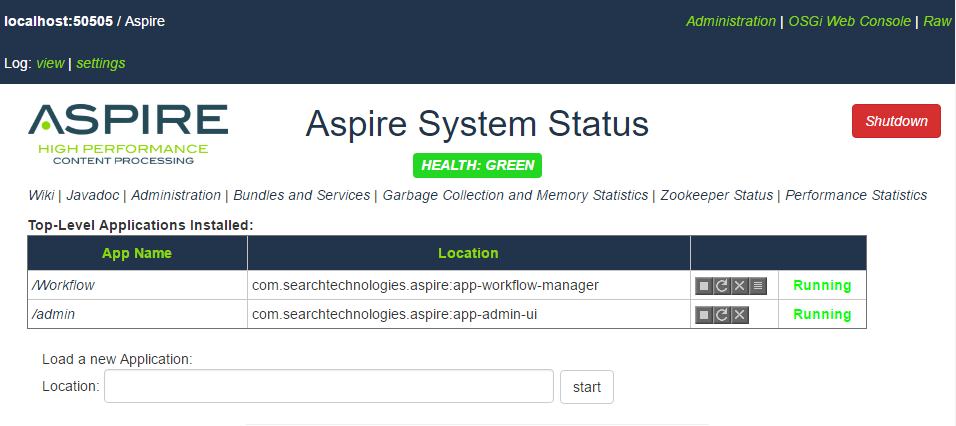
To view the Aspire debug console, go to http://localhost:50505/aspire after starting up the Aspire server.
You can also access it from the System Admin user interface, using the Debug Console link that appears for every server.
The debug console provides status information and some low-level admin controls for Aspire. Some of these functions can also be performed using the Admin UI.
On this page:
Features
Through the debug console you can:
- Load New Applications
- Each Aspire application will be an application.xml file which has components and pipelines for processing content.
- Multiple configurations can be loaded into the same instance of Aspire.
- For example, you can have a separate configuration for each database that you want to process with Aspire.
- Refresh Applications
- This will reload the application.xml file for a configuration, loading all new configuration settings and automatically loading components as needed
- Browse Applications
- Every component in an Aspire Application Configuration has a separate web page.
- Component Status / Component Controls
- Many of the components will use the debug console to display additional status about the component or to allow for administrator control over the component (reloading XSL transforms, etc.)
- For example, you can turn on statistics for pipeline managers to see which pipeline stages are the slowest.
- Force Garbage Collection and show Memory Statistics
- Update Components
- Not only can component configurations be updated, but the binary Java code for individual components can be updated as well. Click on "Check For Updates". If a new version of a component is available from the Maven Repository, you will be given the option to update the component.
- This is possible because Aspire is built on top of OSGi, which allows for Jar files to be dynamically reloaded as needed. The entire Aspire system has been built to allow for dynamic component updates.
- View the OSGi Web Console
- The OSGi web console allows you to interact with Apache Felix directly. The username/password is "admin/admin".
- View the Health of the System
- Clicking on the "Health" Bar will show you detailed health about the system.
- Note that health checks need to be configured in the system, and are not turned on by default (other than the application startup health)
- Clean local Zookeeper data, and see znodes
- Enable disable performance statistis
So you can see, the debug console contains quite a lot of useful functionality.
In general, the debug console is self-documenting. This section will cover some of the inner workings of the interface.
Configuration of the Debug Console
See Changing the Aspire Port Address for information about changing the port address or General Settings for adding a username and password to the debug console.
Every Component has a Web Page
Every component configured in Aspire has a web page. The web page can be accessed using the component's full name as: http://server:50505/aspire/{component-full-name} (see Naming Components for more details on component names).
Navigating
The component manager and pipeline manager components contain links to all of the sub-components they contain. The Aspire application component (the component which reponds to the http://localhost:50505/aspire address) also has links to all of the installed applications.
In this way, you can usually navigate to any component by clicking the links from parent components to sub-components.
Component Commands
Components can also receive commands from the admin user interface. Web commands to individual components have many different purposes:
- Turn on or off debugging
- Turn on or off additional statistics gathering
- To run diagnostic tests on components
- To view additional information on a component
All component commands have a "cmd" parameter which specifies the name of the command to execute. For example, to get the status of a component use:
http://localhost:50505/aspire?cmd=status
Some commands also take additional URL parameters.
In general, it is not necessary to document the component commands, since they should all be available from the System Administration user interface itself.
Common Commands
The following commands are common to all components in Aspire. The format for each command is:
http://server:50505/aspire/{component-name}?cmd={command}&{parameters}
| Command | Parameters | Description |
|---|---|---|
| status | none | Provides status on the command. This provides the same result as navigating to the command in the user interface. |
| log | display | Displays the log file for the specified command. For example, http://localhost:50505/aspire?cmd=log&display will display the log file for the Aspire application component. |
| log | debug=true | Turns on debug logging. Debug messages can be viewed with the log/display command. |
| log | debug=false | Turns off debug logging. |
XML and XSLT
All commands executed by the System Administration user interface return straight XML to the web browser. You can test this by doing a "view source" on any page in the interface (using Firefox; if using IE9, use the developer tools to see the original XML).
In order to convert the XML to a user-friendly display, the XML is transformed to XHTML and CSS using an XSLT stylesheet. The style sheet is automatically located by the Aspire application and if it exists, it is added as an <?xml-stylesheet> processing command to the top of the resulting XML returned by the component. The web browser will then fetch the XSLT transform and will transform the XML into XHTML for display.
Locating the XSL Transform
XSL transforms for the debug console are bundled with the Jar file which contains the component code. This increases the portability of components, since the System Administration user interface (i.e., the XSL transform) is included and installed automatically with the component software itself.
However, the Aspire application will first attempt to load the transform from the following directory:
{Aspire Home}/resources/{component-implementation-class}
This is done for user interface development, since it is much easier to edit files in the Aspire Home directory than it is to edit files inside a component Jar file.
For example, if the component's Java implementation class is "com.searchtechnologies.aspire.components.RDBConnectionStage", then the Aspire application will first attempt to load the transform from the following directory:
{Aspire Home}/resources/com.searchtechnologies.aspire.components.RDBConnectionStage
If the XSLT is not in Aspire Home (and it typically is not), then it will then attempt to locate it in the component's Jar file, under the "resources/{component-implementation-class} directory. In this way, most of the components are bundled with the XSL transform used for their administration user interface.
Create an XSL Interface for the Debug Console
- If you created your component using the Aspire stage archetype:
- Open up the src/main/resources/resources/{Java-Class-Name} folder in your project.
- There will be a default XSL transforms for status.xsl and result.xsl.
- Modify these transform as necessary to provide status for your component.
- There will also be a default image for your component in image.jpeg.
- Load an appropriate image for your component.
- Open up the src/main/resources/resources/{Java-Class-Name} folder in your project.
- Install your component into Aspire.
- Go to your component in the Aspire debug console: http://localhost:50505/aspire
- Check that your component's presentation looks correct.
- If you need to do more complex XSLT editing:
- Copy your "src/main/resources/resources/{Java-Class-Name}" to $ASPIRE_HOME/resources of your Aspire installation.
- Modify your XSLT transform.
- Click Refresh on your Aspire debug console.
- Your XSLT modifications should be immediately available.
- When done, copy the directory $ASPIRE_HOME/resources/{Java-Class-Name} back to the "src/main/resources/resources" directory of your project.
- Re-build your project.
XSL transform File Name
The XSL transform names are the same as the Aspire URL command names, i.e. the command names passed to the "cmd" parameter on the URL.
For example, "status.xsl" is the XSL transform used for all status reports.
If the XSL file for the specific command can not be located, the XSL transform called "result.xsl" will be located. This is the fallback transform used to present the result for most components.
Finally, if no "result.xsl" transform can be located, the XML will be sent directly to the admin user without a transform.
Overview
Content Tools