Basic Setup
Step 1: Download the Plugin Deployment Package
The deployment package zip is located here (see note). Download the latest one and unzip it.
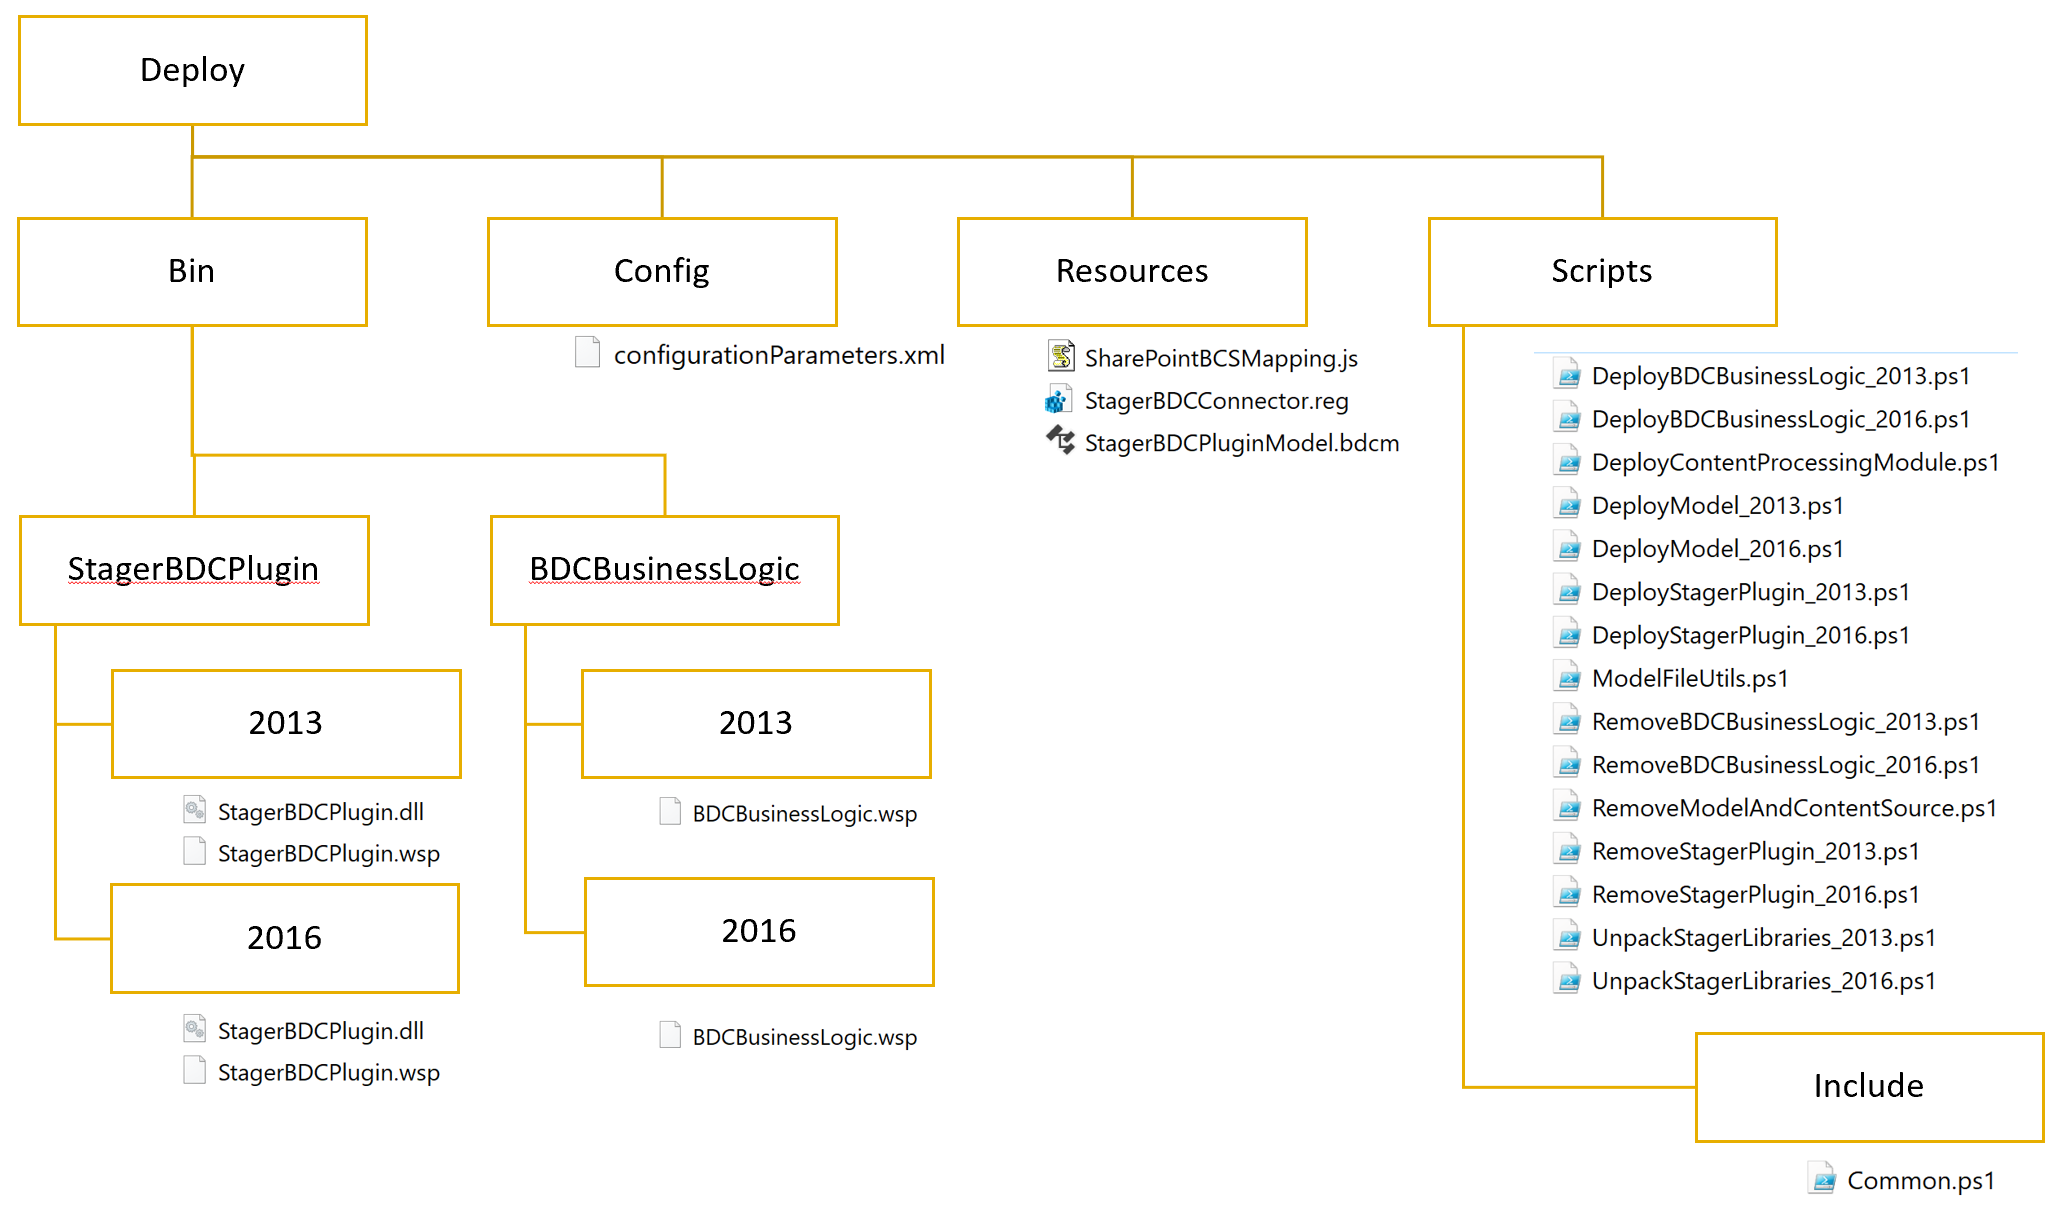
The following is the directory structure within the zip file:
On this page:
Step 2: Plugin setup from scratch
Version 2.X introduces important changes in installation and upgrades. For new installations continue in this section, otherwise look for the corresponding section below.
- Under the \config folder, locate the file named configurationParameters.xml and open it in a file editor.
- In the xml structure, under StagerBDCModel specify the following values which are needed for this operation:
- stagingRepositoryUrl: The host port where the STageR is running
- sharePointServiceUrl: The host port where the SharePoint Central Administration is running
- searchServiceApplicationName: The name of the search service application within SharePoint
- stagerFolderPath: The path to the root directory of STageR
- Open SharePoint Management Shell as an administrator and go to the \scripts folder.
Run the following script for the corresponding SharePoint version. This will install the root assembly of the BDC Plugin. Once installed and crawls have been performed further updates will be explained in the corresponding section.
.\DeployStagerPlugin_2013.ps1 -configurationFilePath ..\config\configurationParameters.xml

.\DeployStagerPlugin_2016.ps1 -configurationFilePath ..\config\configurationParameters.xml

.\DeployStagerPlugin_2019.ps1 -configurationFilePath ..\config\configurationParameters.xml
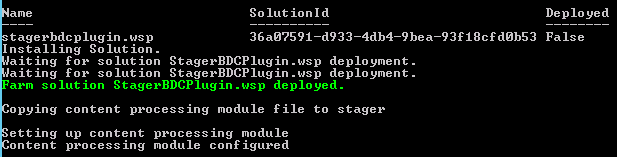
- If all went well it should present the following:
- For every SharePoint search node in the farm, go to the \resources folder and double-click on the file StagerBDCConnector.reg. This will add the versioning information to the registry for the current version of the Business Logic Assembly.
Run the following script for the corresponding SharePoint version. This will install the business logic assemblies of the BDC Plugin.
.\DeployBDCBusinessLogic_2013.ps1 -configurationFilePath ..\config\configurationParameters.xml

.\DeployBDCBusinessLogic_2016.ps1 -configurationFilePath ..\config\configurationParameters.xml

.\DeployBDCBusinessLogic_2019.ps1 -configurationFilePath ..\config\configurationParameters.xml
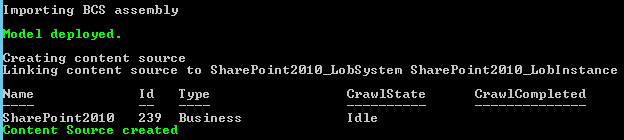
- If all went well it should show the following:

- After installing the Business Logic solution jump to Step 3 to install the model and content source.
Step 2.a.: Upgrade from 1.X versions
Once the BDC model has been created in SharePoint, it is wired to the version of the root assembly, therefore any attempt to update the model with a different version will cause the content source to run a full crawl the next time regardless of the crawl type that was selected and ultimately deleting all content that was previously crawled by the content source.
After trying several solutions, the one that would best address the issue was to separate the root assembly from the actual business logic through reflection. The upgrade consists on overwriting the root assembly with the one provided in the new deployment zip file and then deploying the business logic.
- Locate the deployment configuration and scripts used for the old version of the plugin.
- Execute the SharePoint Management Shell with administrator rights (PowerShell)
- Go to the \scripts folder and run the following to uninstall only the SharePoint solution:
.\RemoveStagerPlugin_2013.ps1 -configurationFilePath ..\config\configurationParameters.xml

.\RemoveStagerPlugin_2016.ps1 -configurationFilePath ..\config\configurationParameters.xml

.\RemoveStagerPlugin_2019.ps1 -configurationFilePath ..\config\configurationParameters.xml
Important
Sometimes SharePoint doesn't remove the solution after running the script. It is a good practice to check under SharePoint's Central Administration → Manage Farm Solutions and if the solution is still there, remove it manually from the UI. See Manual Removal below. - Download and unzip the corresponding deployment zip file into a folder. Here is the one for version 1.0.6.1 and here is the one for 1.0.6.2.
- Under the new folder, go to the \config folder and update the configurationParamenters.xml file with the settings from the old file. Version 1.0.6.0 doesn't have the <contentSource> property, please provide a value.
- Go to the \scripts folder and run the following to install and deploy the new root assembly (with the old version number):
.\DeployStagerPlugin_2013.ps1 -configurationFilePath ..\config\configurationParameters.xml

.\DeployStagerPlugin_2016.ps1 -configurationFilePath ..\config\configurationParameters.xml

.\DeployStagerPlugin_2019.ps1 -configurationFilePath ..\config\configurationParameters.xml
- For every SharePoint search node in the farm, go to the \resources folder and double-click on the file StagerBDCConnector.reg. This will add the versioning information to the registry for the current version of the Business Logic Assembly.
- Go back to the \scripts folder and run the following. This will install the business logic assemblies of the BDC Plugin:
.\DeployBDCBusinessLogic_2013.ps1 -configurationFilePath ..\config\configurationParameters.xml

.\DeployBDCBusinessLogic_2016.ps1 -configurationFilePath ..\config\configurationParameters.xml

.\DeployBDCBusinessLogic_2019.ps1 -configurationFilePath ..\config\configurationParameters.xml
- If all went well it should show this:
- Since this is an upgrade you don't need to create models and content sources, they will use the new version. Also the Content Processing Module should already be in place.
Step 2.b.: Upgrade from 2.X versions
Upgrades from version 2.X are easier since they only require removing the previous Business Logic components and then installing the new ones, and updating the registry settings.
- Locate the deployment configuration and scripts used for the previous version of the plugin.
- Execute the SharePoint Management Shell with administrator rights (PowerShell)
Go to the \scripts folder and run the following to uninstall only the SharePoint solution:
.\RemoveBDCBusinessLogic_2013.ps1 -configurationFilePath ..\config\configurationParameters.xml

.\RemoveBDCBusinessLogic_2016.ps1 -configurationFilePath ..\config\configurationParameters.xml

.\RemoveBDCBusinessLogic_2019.ps1 -configurationFilePath ..\config\configurationParameters.xml
Important
Sometimes SharePoint doesn't remove the solution after running the script. It is a good practice to check under SharePoint's Central Administration → Manage Farm Solutions and if the solution is still there, remove it manually from the UI. See Manual Removal below.- Unzip the new deployment zip file into a folder
- Under the new folder, go to the \config folder and update the configurationParamenters.xml file with the settings from the old file.
- For every SharePoint search node in the farm, go to the \resources folder and double-click on the file StagerBDCConnector.reg. This will update the versioning information to the registry for the current version of the Business Logic Assembly.
- Go back to the \scripts folder and run the following for the corresponding SharePoint version. This will install the business logic assemblies of the BDC Plugin:
.\DeployBDCBusinessLogic_2013.ps1 -configurationFilePath ..\config\configurationParameters.xml

.\DeployBDCBusinessLogic_2016.ps1 -configurationFilePath ..\config\configurationParameters.xml

.\DeployBDCBusinessLogic_2019.ps1 -configurationFilePath ..\config\configurationParameters.xml
- If all went well it should show this:
- Since this is an upgrade you don't need to create models and content sources, they will use the new version. Also the Content Processing Module should already be in place.
Step 3: Model and Content Source Setup
- Under the \config folder, locate the file named configurationParameters.xml (the one you modified in the previous step) and create a copy of it.
- Modify the following fields in the new copy:
- contentSourceName: The name of the content source that will appear under Search Service Application in SharePoint
- storageUnitName: The name of the Storage Unit within STageR from which the content will be extracted
- storageUnitScope: The scope within the Storage Unit. The value of 'publisher' is recommended.
- maxBatchesToProcess: The maximum number of batches processed by the plugin per execution
- batchSize: The maximum number of documents per batch processed
- certPath: The path to the .p12 or .pfx file if SSL is needed. If not, leave the field empty.
- certPassword: The password to the .p12/.pfx file if SSL is needed. If not, leave the field empty.
- claimsIssuer: The issuer of the access claims. Accepted values are 'public' for no issuer, 'aspire' to use the Aspire Group Expansion or 'windows'.
- useFullName: Specifies if claims should use full name (domain/name) when sent to the group expander
- Open the SharePoint Management Shell as an administrator and go to the \scripts folder.
Run the following script for the corresponding SharePoint version:
.\DeployModel_2013.ps1 -configurationFilePath ..\config\<the file name of the new xml>

.\DeployModel_2016.ps1 -configurationFilePath ..\config\<the file name of the new xml>

.\DeployModel_2019.ps1 -configurationFilePath ..\config\<the file name of the new xml>
- If all went well, it should present the following:
The default values defined in the configurationParameters.xml file in the StagerBDCModel node will crawl 500 items in the Storage Unit specified (maxBatchesToProcess times batchSize). If the Storage Unit contains more than that amount they will no be crawled in the first full crawl.
Step 4: Content Processing Module setup
Currently, the content source/model installation script doesn't support the setup of the content processing module in StageR when it's configured to use SSL. Configure the content processing module using a REST client as explained here. Also, this only works for Windows hosts. For other operating systems use the manual approach.
- Under the \config folder, locate the file named configurationParameters.xml and open it in a file editor.
- In the xml structure, under StagerBDCModel specify the following values:
- stagerFolderPath: The local path to the root directory of STageR
- Open SharePoint Management Shell as an administrator and go to the \scripts folder.
Run the following:
.\DeployContentProcessingModule.ps1 -configurationFilePath ..\config\<the file name of the new xml>
- No error should appear if all went well.
This has to be done on every machine that will host STageR. You can just copy the whole Deploy folder to each machine, change the stagerFolderPath value as needed and then run the script.
Step 4a: Manual Setup
This applies for non-Windows operating systems.
- Copy the SharePointBCSMapping.js file to STageR's \process_modules directory.
From a REST client run the following command:
http://<host:port>/admin/setContentProcessingModules/<Storage Unit Name>

{"modules" : {"<Storage Scope Name>":[{"module" : "SharePointBCSMapping"}]}}
Step 5: Schedule the Content Source Crawls
- Go to SharePoint Central Admin > Manage Service Applications > Search Service Application (the name specified in the configuration) > Content Sources
- Locate the content source you configured in the previous step.
- From the drop-down, you can trigger crawls directly. To schedule automatic crawls, select Edit.
- In the new page, scroll down to Crawl Schedules and set the schedule as needed.
Uninstallation
In order to remove the StageR BDC Plugin, there are two options: manual and automatic removal
Please note that uninstallation process requires a user with Machine Administrator rights.
Manual Removal
Step 1: Remove Content Source
- Go to SharePoint Central Admin > Manage Service Applications > Search Service Application (the name specified in the configuration) > Content Sources
- Locate the content source you want to remove.
- From the drop-down, select Delete and confirm.
Step 2: Remove Model

- Go to SharePoint Central Admin > Manage Service Applications > Business Data Connectivity Service
- From the top drop-down, select BDC Models.
- Select the model you want to remove. (Its name should be similar to the content source's name.)
- Click Delete and confirm.
Step 3: Remove the Plugin from Farm Solutions
Go to the Services Management console and restart the service named SharePoint Server Search 15.
Sometimes this service doesn't release the farm solution and it becomes impossible to remove it from the SharePoint Central Admin.- Make sure the service named SharePoint Timer Service is up and running.
- Make sure the service named SharePoint Administration Service is up and running.
- Open your preferred internet explorer (IE, Chorme, FireFox, etc) with the "Run as Administrator" option. Otherwise, you will not be able to accomplish the next two steps due to a SharePoint error.
- Go to SharePoint Central Admin > System Settings > Manage Farm Solutions
- Select stagerbdcplugin.wsp and Retract Solution.
- In the following page, make sure the option under Retract When? is set to Now.
Select OK.
The user needs to be machine administrator for this to work.- Wait for the solution to retract. (Keep refreshing the browser window.)
- Once the solution is retracted, click on it again and once inside the page, select Remove Solution.
Removal should be quick. - Repeat steps 6 thru 10 for bdcbusinesslogic.wsp.


Automatic Removal
Step 1: Remove Content Source and Model
Open SharePoint Management Shell as administrator.
A machine and farm administrator user is needed for this.- Go to the Deploy\scripts directory.
Run the following:
.\RemoveModelAndContentSource.ps1 -configurationFilePath ..\config\<The Content Source configuration>.xml
Make sure the configuration file you specified is the same one you used when creating the content source you want to remove.- Both the content source and model should have been removed.
Step 2: Remove Plugin
Open SharePoint Management Shell as administrator.
A machine and farm administrator user is needed for this.- Go to the Deploy\scripts directory.
Run the following script for the corresponding SharePoint version:
.\RemoveStagerPlugin_2013.ps1 -configurationFilePath ..\config\configurationParameters.xml

.\RemoveStagerPlugin_2016.ps1 -configurationFilePath ..\config\configurationParameters.xml

.\RemoveStagerPlugin_2019.ps1 -configurationFilePath ..\config\configurationParameters.xml
Run the following script for the correspondint SharePoint version:
.\RemoveBDCBusinessLogic_2013.ps1 -configurationFilePath ..\config\configurationParameters.xml

.\RemoveBDCBusinessLogic_2016.ps1 -configurationFilePath ..\config\configurationParameters.xml

.\RemoveBDCBusinessLogic_2019.ps1 -configurationFilePath ..\config\configurationParameters.xml
- The farm solution should have been removed.
Important
Sometimes SharePoint doesn't remove the solution after running the script. It is a good practice to check under SharePoint's Central Administration → Manage Farm Solutions and if the solution is still there, remove it manually from the UI. See Manual Removal below.
Custom Content Configuration
The plugin uses the content processing capability of STageR to normalize the content that is stored in STageR, but the structure and data may be different depending on the source.
The content is processed by SharePointBCSMapping.js after the file is in the STageR's processing_modules directory and the storage unit has been configured to use it. For more information, go Configure Storage Unit.
The SharePointBCSMapping.js file can be modified to add, rename, update or delete fields that will be uploaded to SharePoint. However, the following fields are expected by the BDC connector and therefore cannot be changed:
- action
- docId
- name
- claims_issuer
- use_full_name
- author
- last_modified
- title
- description
- url
- text
- acls
Security Pre-Trimmer Installation
For SharePoint Security Pre-Trimmer installation steps go to SharePoint Security Pre-Trimmer 3.2.
Overview
Content Tools