Step 1. Launch Aspire and open the Content Source Management Page
Launch Aspire (if it's not already running). See:
- Launch Control
- Browse to: http://localhost:50505. For details on using the Aspire Content Source Management page, please refer to Admin UI
Before launching Aspire, you need to change the felix.properties file and add these lines if the Kerberos authentication is going to be used:
Step 2. Add a new HBase Content Source
To specify exactly what shared folder to crawl, we will need to create a new "Content Source".
To create a new content source:
- From the Content Source , click Add Source.
- Click HBase Connector.
Step 2a. Specify Basic Information
In the General tab in the Content Source Configuration window, specify basic information for the content source:
- Name: Enter a content source name
- This is any useful name which you decide is a good name for the source. It will be displayed in the content source page, in error messages, etc.
- Click on the Scheduled pull-down list and select one of the following: Manually, Periodically, Daily, Weekly or Advanced
- Aspire can automatically schedule content sources to be crawled on a set schedule, such as once a day, several times a week, or periodically (every N minutes or hours).
For the purposes of this tutorial, you may want to select Manually and then set up a regular crawling schedule later.
- Aspire can automatically schedule content sources to be crawled on a set schedule, such as once a day, several times a week, or periodically (every N minutes or hours).
- Click on the Action pull-down list to select one of the following: Start, Stop, Pause, or Resume
- This is the action that will be performed for that specific schedule.
- Click on the Crawl pull-down list and select one of the following: Incremental, Full, Real Time, or Cache Groups
- This will be the type of crawl to execute for that specific schedule.
- This will be the type of crawl to execute for that specific schedule.
After selecting Scheduled, specify the details, if applicable:
- Manually: No additional options.
- Periodically: Specify the "Run every:" options by entering the number of "hours" and "minutes."
- Daily: Specify the "Start time:" by clicking on the hours and minutes drop-down lists and selecting options.
- Weekly: Specify the "Start time:" by clicking on the hours and minutes drop-down lists and selecting options, then clicking on the day checkboxes to specify days of the week to run the crawl.
- Advanced: Enter a custom CRON Expression (e.g. 0 0 0 ? * *)
You can add more schedules by clicking in the Add New option, and rearrange the order of the schedules.
If you want to disable the content source, clear the Enable check box. This is useful if the folder will be under maintenance and no crawls are wanted during that period of time.
Real Time and Cache Groups crawl will be available depending of the connector.
Step 2b. Specify the Connector Information
In the Connector tab, specify the connection information to crawl the HBase.
- Source Name: Enter the source name to use for publishing the document.
- Namespace prefix: Enter the prefix of the name space.
- Create Namespaces: Select this option if the publisher should attempt to create the namespaces
- Configuration type
- Use Settings file:
- HBase configuration file path: Enter the path that contains the HBase configuration file.
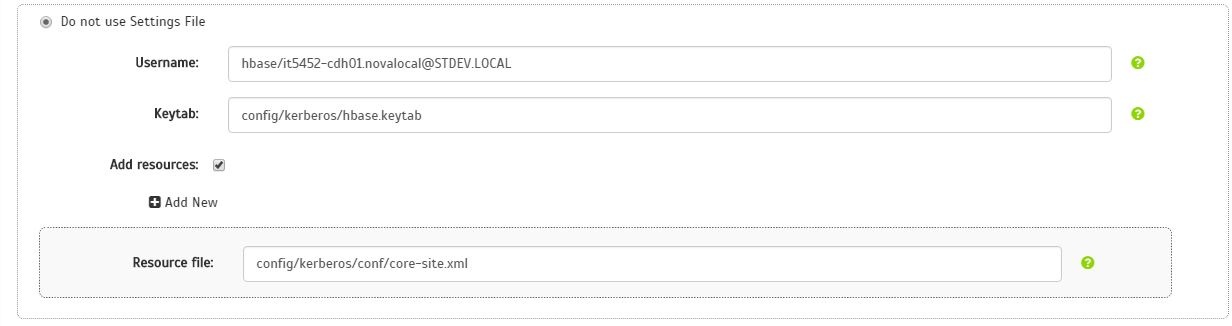
- Do not use Settings File
- Username: Kerberos User with the permissions to crawl from HBase.
- Keytab: Path to the Keytab file to use.
- Add resources: Check if you are going to pass Hadoop resources files (hbase-site.xml) to the publisher.
- Resource file: Hadoop resource file path.
- Add properties: Check if you are going to pass specific Hadoop properties to the publisher.
- Name: Hadoop property name.
- Value: Hadoop property value.
- Use Settings file:
- Slices: The number of slices to use for the crawl.
- Retries: The number of times to retry a HBase scan call.
- Retry Wait Time: The time in milliseconds to wait before each retry

Step 2c. Specify Workflow Information
In the Workflow tab, specify the workflow steps for the jobs that come out of the crawl. Drag and drop rules to determine which steps an item should follow after being crawled. These rules could include where to publish the document or transformations needed on the data before sending it to a search engine. See Workflow for more information.
- For the purpose of this tutorial, drag and drop the Publish To File rule found under the Publishers tab to the onPublish Workflow tree.
- Specify a Name and Description for the Publisher.
- Click Add.
After completing these steps, click Save and Done. You'll be sent back to the Home page.
During the Crawl
During the crawl, you can do the following:
- Click Refresh on the Content Sources page to view the latest status of the crawl.
The status will show RUNNING while the crawl is going, and CRAWLED when it is finished. - Click Complete to view the number of documents crawled so far, the number of documents submitted, and the number of documents with errors.
If there are errors, you will get a clickable "Error" flag that will take you to a detailed error message page.
Overview
Content Tools