Follow this procedure to learn how to publish to Elasticsearch.
On this page:
 Step 1. Launch Aspire and open the Content Source Management Page
Launch Aspire (if it's not already running). See:
- Browse to: http://localhost:50505. For details on using the Aspire Content Source Management page, please refer to Admin UI
Step 2. Add a new Content Source
- For this step please follow the step from the Configuration Tutorial of the connector of you choice, please refer to Connector list
Step 3. Add a new Publish to Elasticsearch to the Workflow
To add a Publish to ElasticSearch drag from the Publish to ElasticSearch rule from the Workflow Library and drop to the Workflow Tree where you want to add it. This will automatically open the Publish to ElasticSearch window for the configuration of the publisher.
Step 3a. Specify Publisher Information
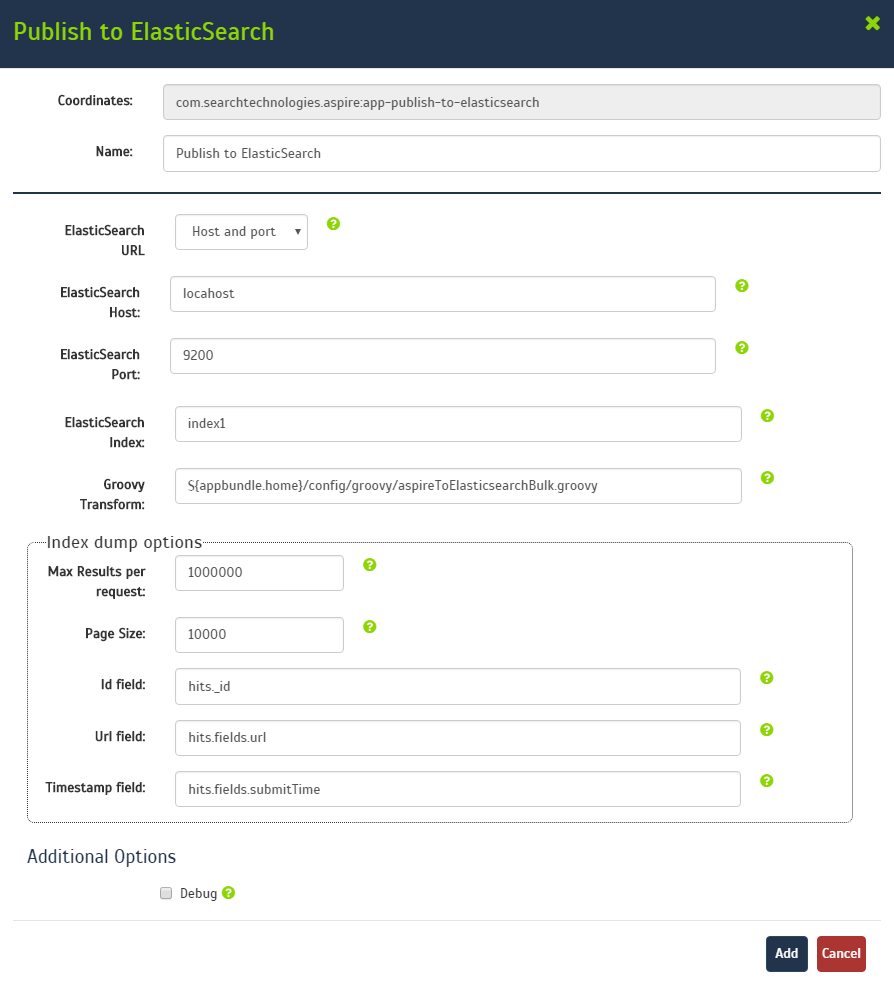
In the Publish to ElasticSearch window, specify the connection information to publish to the index.
- Name: Enter the name of the publisher. (This name must be unique).
- ElasticSearch URL: Select how you want to enter the ElasticSearch URL
- Host and port
- ElasticSearch Host: Enter the ElasticSearch host.
- ElasticSearch Port: Enter the ElasticSearch port (9200 by default)
- Complete Url
- ElasticSearch URL: Enter the url for the ElasticSearch bulk index endpoint, it must have this format <protocol>://<host>:<port>/_bulk
- Host and port
- ElasticSearch Index: Enter the index to which the jobs are going to be publish.
- Groovy Transform: set to the default parameter to use the default JSON transformation file. To use a custom file, follow the instructions in JSON Transformation
HINT: The default file is located at ${appbundle.home}. if user is using other file in the /config/xls folder, the value should be change to ${aspire.home}/config/xls
The user is responsible for ensuring that the location typed in that box is the correct one of the file being used. - Max Results per request: How many documents can be fetched by the search engine for the same query
- Page size: How many documents to fetch per page
- Id field: Field used to store the id in elasticsearch. Used to compare against the content source audit logs
- Url field: Field used to store the url in elasticsearch
- Timestamp field: the name of the timestamp field holding the index timestamp of every document
- Debug: Check if you want to run the publisher in debug mode.
- Enable Delete by Query: Check if you want to disable the Delete by Query Feature. (3.1.1 only)
Note: The Delete by Query feature does not work on Elasticsearch 5.x onward - Click on the Add button.
Once you've clicked on the Add button, it will take a moment for Aspire to download all of the necessary components (the Jar files) from the Maven repository and load them into Aspire. Once that's done, the publisher will appear in the Workflow Tree.
For details on using the Workflow section, please refer to Workflow introduction.
Overview
Content Tools