Step 1. Launch Aspire & open the Content Source Management page
Launch Aspire (if it's not already running).
See:
- Launch Control
- Browse to: http://localhost:50505.
For details on using the Aspire Content Source Management page, please refer to Admin UI.
Step 2. Add a new RDB via Snapshot content source
To specify exactly which shared folder to crawl, we will need to create a new "Content Source".
To create a new content source:
- From Content Source, click Add Source.
- Click RDB via Snapshot Connector.
Step 2a. Specify basic information
In the General tab in the Content Source Configuration window, specify basic information for the content source:
- Enter a content source name in the "Name" field.
- This is any useful name which you decide is a good name for the source. It will be displayed in the content source page, in error messages, etc.
- Click on the Scheduled pull-down list and select one of the following: Manually, Periodically, Daily,Weekly or Advanced.
- Aspire can automatically schedule content sources to be crawled on a set schedule, such as once a day, several times a week, or periodically (every N minutes or hours).
- For the purposes of this tutorial, you may want to select Manually and then set up a regular crawling schedule later.
- Click on the Action pull-down list to select one of the following: Start, Stop, Pause, or Resume.
- This is the action that will be performed for that specific schedule.
- Click on the Crawl pull-down list and select one of the following: Incremental, Full, Real Time, or Cache Groups.
- This will be the type of crawl to execute for that specific schedule.
After selecting a Scheduled option, specify the details, if applicable:
- Manually: No additional options.
- Periodically: Specify the "Run every:" options by entering the number of "hours" and "minutes."
- Daily: Specify the "Start time:" by clicking on the hours and minutes drop-down lists and selecting options.
- Weekly: Specify the "Start time:" by clicking on the hours and minutes drop-down lists and selecting options, then selecting the day check boxes to specify days of the week to run the crawl.
- Advanced: Enter a custom CRON Expression (e.g. 0 0 0 ? * *)
You can add more schedules by clicking the Add New option, and rearranging the order of the schedules.
If you want to disable the content source, just clear the the Enable checkbox. This is useful if the folder will be under maintenance and no crawls are wanted during that period of time.
Real Time and Cache Groups crawl will be available depending of the connector.
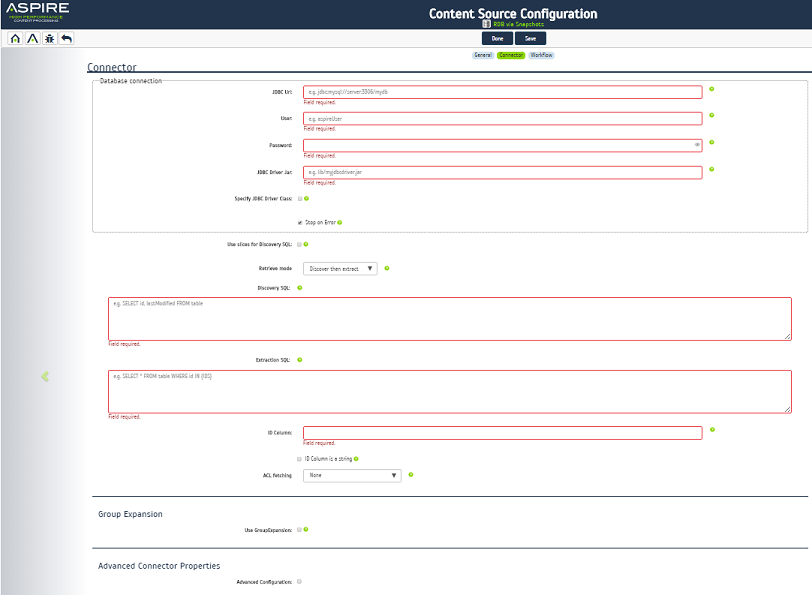
Step 2b. Specify the connector information
In the Connector tab, specify the connection information to crawl the RDB via Snapshot.
- Database connection information
- JDBC Url - The default url for your RDBMS server and database. For example, "jdbc:mysql://server:3306/mydb" (MySQL). This may vary depending on the type of RDBMS.
- User - The default name of a database user with read-only access to all of the tables containing data to be indexed.
- Password - The password for the database user.
- JDBC Driver Jar - Path to the default JDBC driver jar file for your RDBMS. Typically, this is placed in the "lib" directory inside your Aspire Home. For example "lib/myjdbcdriver.jar"
- Specify JDBC Driver Class - Check the check box to manually specify the JDBC driver.
- Stop on Error - When selected, the scan stops if the JDBC driver throws an error while getting a row, and the crawl halts. When cleared, the connector attempts to get subsequent rows.
- Use slices for Discovery SQL - Select this option to divide the discoverySQL into multiple slices.
For example, if you have a 10 Million row table to scan, executing the 10 M query will take a while. After it completes, the connector starts sending items. By activating 10 slices, the scan is split into 10 1-million scans, which takes less time and you can view results faster. This only works when the idColumn contains an integer. - Retrieve mode - In "Discover then extract" mode, a query runs to identify the updated content in the database. A separate query runs to extract the full content for the changed item.
In "Extract only" mode, a single query runs to extract all of the content in the database. Only updated content is submitted for processing. - Discovery SQL - Indicate the "SELECT" query to run for discovering documents. This query is used for full or incremental scans. A "WHERE" clause can be used to specify any required condition for crawling the desired documents. A change to any column selected in this SQL will cause the document to be re-indexed.
For example: "SELECT idCol, lastModifiedDate FROM data_table". When slicing is enabled, add a "WHERE" clause containing "{SLICES}". For example: "SELECT idCol, col1 FROM data_table WHERE {SLICES}". - Extraction SQL - Indicate the "SELECT" query for extracting all data for each document found in the Discovery SQL. At the least, you must include a "WHERE" clause containing the expression "idColumnName IN {IDS}", where idColumnName corresponds to a unique key field name. {IDS} is replaced automatically by the connector with the corresponding unique key values.
For example: "SELECT col1, col2, col3 FROM data_table WHERE idCol in {IDS}" You must not include the {SLICES} condition here. - ID Column - The column name that holds the unique key. The default name of the column which holds the value to use as the document id. This column must be present in both discoverySQL and extractionSQL. SQL aliases are not supported.
- ID Column is a string - Select the check box if the unique key is a string value.
- ACL fetching - Choose a method for getting ACLs.
- Group Expansion
- Use GroupExpansion - Make sure this connector supports Group Expansion before selecting this option. To provide a search result set of all documents to which a user has access, Group Expansion receives a username and calculates the full set of groups to which the user belongs.
- Advanced Connector Properties
- Advanced Configuration - Select the check box to enable advanced connector properties.
Step 2c. Specify the workflow information
In the Workflow tab, specify the workflow steps for the jobs that come out of the crawl. Drag and drop rules determine which steps an item should follow after being crawled. These rules include where to publish the document, or transformations needed on the data before sending it to a search engine. See Workflow for more information.
- For the purpose of this tutorial, drag and drop the Publish To File rule found under the Publishers tab to the onPublish Workflow tree.
- Specify a Name and Description for the Publisher.
- Click Add.
- After completing these steps, click Save and Done, and you'll be sent back to the Home page.
Step 3: Initiate a full crawl
Now that the content source is set up, the crawl can be initiated.
- Click on the crawl type option to set it as Full.
- The default is Incremental, and the first time it'll work like a full crawl.
- After the first crawl, set it to Incremental to crawl for any changes made in the repository.
- Click Start.
During the crawl
During the crawl, you can do the following:
- Click Refresh on the Content Sources page to view the latest status of the crawl.
The status will show RUNNING while the crawl is going, and CRAWLED when it is finished. - Click Complete to view the number of documents crawled so far, the number of documents submitted, and the number of documents with errors.
If there are errors, you will get a clickable Error flag that will take you to a detailed error message page.
Step 4: Initiate an incremental crawl
If you only want to process content updates from the RDB via Snapshot (documents that are added, modified, or removed), then click Incremental instead of Full. The RDB via Snapshot connector will automatically identify only changes that have occurred since the last crawl.
If this is the first time that the connector has crawled, the action of the Incremental option depends on the exact method of change discovery. It may perform the same action as a Full crawl – crawling everything, or it may not crawl anything. Thereafter, the Incremental option will only crawl updates.
Statistics are reset for every crawl.
Group Expansion
Group expansion configuration is done on the Advanced Connector Properties of the Connector tab.
- Select the Advanced Configuration check box to enable the advanced properties section.
- Scroll down to Group Expansion and select the check box.
- Add a new source for each repository that you want to expand groups from (you'll need Administrator rights on all of them to be able to do this).
- Set the default domain, user name and password of the crawl account.
- Set a schedule for group expansion refresh and cleanup.
- (Optional) Select the Use external Group Expansion check box to choose an LDAP Cache component for LDAP group expansion. For more information on the LDAP Cache component, see LDAP Cache.
Overview
Content Tools