 Step 1. Launch Aspire and open the Content Source Management Page
Launch Aspire (if it's not already running). See:
- Launch Control
- Browse to: http://localhost:50505. For details on using the Aspire Content Source Management page, please refer to Admin UI
Step 2. Add a new Content Source
- For this step please follow the step from the Configuration Tutorial of the connector of you choice, please refer to Connector list
Step 3. Add a new Publish to CloudSearch to the Workflow
To add a Publish to CloudSearch drag from the Publish to CloudSearch rule from the Workflow Library and drop to the Workflow Tree where you want to add it. This will automatically open the Publish to CloudSearch window for the configuration of the publisher.
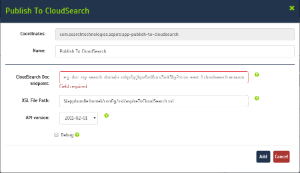
Step 3a. Specify Publisher Information
In the Publish to CloudSearch window, specify the connection information to publish to the Amazon CloudSearch.
- Enter the name of the publisher. (This name must be unique).
- Enter the description of the publisher that will be shown in the Workflow Tree.
- Enter the Cloudsearch Doc Endpoint. (doc-my-search-domain-odqxfqrjhpv6x6ucv3mk3ky2m.us-east-1.cloudsearch.amazonaws.com)
- XSL File Path: set to the default parameter to use the default XSL transformation file. To use a custom file, follow the instructions in Edit XSL
- API Version: Cloudsearch version of the index
- Debug: Check if you want to run the publisher in debug mode.
- Click on the Add button.
Once you've clicked on the Add button, it will take a moment for Aspire to download all of the necessary components (the Jar files) from the Maven repository and load them into Aspire. Once that's done, the publisher will appear in the Workflow Tree.
For details on using the Workflow section, please refer to Workflow introduction.
Overview
Content Tools