Page History
Overview
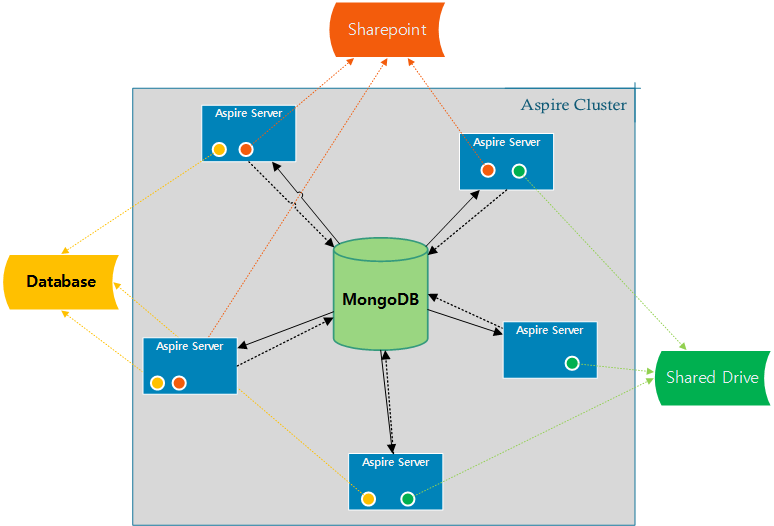
Since the 3.2 release, Aspire connectors are able to crawl in distributed mode automatically. Since all the crawl control data is stored in MongoDB, by just adding more Aspire servers configured to use the same MongoDB, the common connectors are going to crawl distributively.
Each connector is responsible for talking to the repositories, scanning through all the items to fetch and store its IDs to MongoDB for being processed later by any other server or itself.
Configuration
In order to setup an Aspire Cluster for Distributed Processing, you need to do the following steps:
Setup MongoDB
You need to configure all Aspire servers to use the same MongoDB Installation, configure all the Aspire Servers config/settings.xml file
Excerpt Include MongoDB Settings MongoDB Settings
If you need to connect to a multi node MongoDB installation, check: Connect to a Multi-node MongoDB InstallationSetup Zookeeper
More details for Zookeeper installation and settings at Failover Settings (Zookeeper)
Excerpt Include Failover Settings (Zookeeper) Failover Settings (Zookeeper) Install the content sources to distribute
Now it is time to think about which content sources you want to crawl distributively, and from what Aspire Servers, according to your solution architecture.
For this, configure the content sources in one of the servers and once you have them correctly configured export the content source and import it into the Aspire Servers you want to crawl this content source in parallel.
Crawl Control
Controlling distributed processing is very simple. Simply log in to any Aspire node in the cluster and perform the required action (start, pause, resume or stop). All Aspire nodes in the cluster will then move to the same state.
| Warning |
|---|
If you need to shutdown one (or all) servers, you must first pause all running crawls. If you DO NOT pause the crawl and shutdown Aspire on a node in the cluster, Aspire will pause all running crawls before shutting down |
Adding or Removing Nodes on the Aspire Cluster
If you need to add Aspire nodes to the Aspire cluster, simply start an Aspire instance that uses the same Zookeeper and MongoDB instance. As Aspire starts, it will copy the current configuration from the cluster and begin processing (if crawls are currently in process).
If you need to remove an Aspire node from the cluster, either pause all running crawls or allow all them to finish. Once no crawls are active, simply stop Aspire on the desired servers (and turn them off if required). Once only the desired Aspire nodes are running, login to the user interface on any Aspire node and start or un-pause crawls as required
| Warning |
|---|
If you need to remove one (or all) Aspire nodes from the cluster, you must first pause all running crawls. If you DO NOT pause the crawl and shutdown Aspire on a node in the cluster, Aspire will pause all running crawls before shutting down |
What is Aspire Distributed Processing?
This feature allows jobs to be sent to remote Aspire Distributions (called remote nodes). This can increase performance when there are high resource consuming pipelines, by load balancing the work across all available remote nodes.
Communications between remote nodes will be tightly coupled, meaning that they must be on the same intranet, geographically on the same place and (recommended) with no firewalls and other security mechanisms between nodes on the cluster.
Discovery Managers
A Discovery Manager is a component that handles different methods of discovery for remote nodes. There are three different Discovery Managers: Default, Amazon EC2 and ZooKeeper.
Default Discovery Manager
This Discovery Manager has the basic functionality for remote nodes and resource discovery.
Example configuration:
<discoveryManager type="default">

</discoveryManager>
Discovery Methods
One of the following discovery methods must be configured inside the <discoveryManager type="default"> tag.
Static Discovery
Useful for debugging or in well known cluster setups (with static IP addresses configurations). Reads a list of remote nodes and registers them for remote branching.
Each node is identified by its IP Address and its distributed communications port.
Available options are:
...
Example configuration:
<discoveryManager type="default">
	<discovery type="static">
		<checkTimeout>45000</checkTimeout>
		<remoteNodes>
			<remoteNode portNumber="51510">10.10.30.122</remoteNode>
			<remoteNode portNumber="51515">10.10.20.139</remoteNode>
		</remoteNodes>
	</discovery>
</discoveryManager>
You must specify each remote node IP Address and port as shown above. Notice that the port number corresponds to the distributed communications port, not the Aspire ordinary HTTP port.
Broadcast Discovery
Intercepts discovery messages sent by other nodes. If the incoming message is from a new node, it is registered. Otherwise, that node information is updated.
You must enable this discovery method if you want a node to broadcast information about itself.
Available options are:
| Element | Type | Default | Description |
|---|---|---|---|
| broadcastPort | int | none | (required) Port used to listen for other nodes messages and to broadcast information about the current node. |
| multicastAddressGroup | none | Multicast address group used to listen and send broadcast messages. This group must be the same on all nodes on the same cluster. |
Example configuration:
<discoveryManager type="default">
	<discovery type="broadcast">
		<broadcastPort>10324</broadcastPort>
		<multicastAddressGroup>230.0.0.1</multicastAddressGroup>
	</discovery>
</discoveryManager>
Complete example
<distributedCommunications enabled="true">
	<checkpointJobRequests>true</checkpointJobRequests>
	<connectionIdleTimeout>120000</connectionIdleTimeout>
	<port>51510</port>
	<pollTimeout>100</pollTimeout>
	<tcp>
		<keepAlive>false</keepAlive>
		<trafficClass>2</trafficClass>
		<reuseAddress>false</reuseAddress>
		<readTimeout>10000</readTimeout>
		<tcpNoDelay>false</tcpNoDelay>
	</tcp>
	<discoveryManager type="default">
		<discovery type="static">
			<checkTimeout>45000</checkTimeout>
			<remoteNodes>
				<remoteNode portNumber="51515">192.168.0.122</remoteNode>
				<remoteNode portNumber="51515">10.10.20.139</remoteNode>
			</remoteNodes>
		</discovery>

		<discovery type="broadcast">
			<broadcastPort>10324</broadcastPort>
			<multicastAddressGroup>230.0.0.1</multicastAddressGroup>
		</discovery>
	</discoveryManager>
</distributedCommunications>
Amazon EC2 Discovery Manager
Since you cannot use the broadcast discovery method at Amazon Elastic Compute Cloud because of network restrictions, you can use the Amazon EC2 Discovery Manager for dynamic discovering of remote nodes.
| Element | Type | Default | Description |
|---|---|---|---|
| implementation | string | none | (required) Maven coordinates of the jar file that contains the implementation for the Discovery Manager. |
Example configuration:
<discoveryManager type="amazonec2">
      <implementation>com.searchtechnologies.aspire:aspire-amazonec2-dm</implementation>

</discoveryManager>
Amazon EC2 Discovery Method
| Element | Type | Default | Description |
|---|---|---|---|
| accessKey | string | none | (required) Encrypted access key provided by Amazon for your AWS Account. |
| secretKey | string | none | (required) Encrypted secret key provided by Amazon for your AWS Account. |
| usePublicIP | boolean | false | (Optional) Specifies whether or not the remote nodes should be accessed by its public IP Address. |
| securityGroup | string | none | (Optional) Specifies the name of the security group of the ec2 instances that should be discovered. |
| pollFrequency | int | 1000 | (Optional) Specifies the frequency for polling the information from Amazon EC2. |
Example configuration:
<discoveryManager type="amazonec2">
	<implementation>com.searchtechnologies.aspire:aspire-amazonec2-dm</implementation>

	<discovery type="amazonec2">
		<accessKey>encrypted:ENCRYPTED_ACCESS_KEY</accessKey>
		<secretKey>encrypted:ENCRYPTED_SECRET_KEY</secretKey>
	</discovery>

</discoveryManager>
Advanced configuration:
<discoveryManager type="amazonec2">
	<implementation>com.searchtechnologies.aspire:aspire-amazonec2-dm</implementation>

	<discovery type="amazonec2">
		<accessKey>encrypted:ENCRYPTED_ACCESS_KEY</accessKey>
		<secretKey>encrypted:ENCRYPTED_SECRET_KEY</secretKey>
		<usePublicIP>false</usePublicIP>
		<securityGroup>MySecurityGroup</securityGroup>
		<pollFrequency>1000</pollFrequency>
	</discovery>

</discoveryManager>
Zookeeper Discovery Manager
This discovery manager uses zookeeper as a centralized site for discovering remote nodes and their resources as well. Click here for details about Zookeeper installation and configuration.
...
Example configuration:
<discoveryManager type="zookeeper">
	<implementation>com.searchtechnologies.aspire:aspire-zk-dm</implementation>

	<zookeeperConnection>127.0.0.1:2182,127.0.0.1:2183,127.0.0.1:2181</zookeeperConnection>

</discoveryManager>
Advanced configuration:
<discoveryManager type="zookeeper">
	<implementation>com.searchtechnologies.aspire:aspire-zk-dm</implementation>

	<zookeeperConnection>127.0.0.1:2182,127.0.0.1:2183,127.0.0.1:2181</zookeeperConnection>
	<zookeeperPath>/aspire/nodes</zookeeperPath>
	<zookeeperTimeout>3000</zookeeperTimeout>
	<resourceUpdateTime>2000</resourceUpdateTime>

</discoveryManager>
Known Issues
...
Overview
Content Tools