The Workflow is divide in 2 parts, the Workflow Library and the Workflow Tree, please see Workflow Section.
Workflow Library
In the Workflow Library you can find all the applications and rules to create our own business rules just by dragging and dropping into the Workflow Tree, all stored in a collapsible menu divide by categories. In the workflow we can find 2 types of rules.
- Applications Rules
- Downloadable java components (Publishers , Applications and Big data)
- Script Rules
- Predefined templates of Groovy scripts. (Folder, Base Functions, Choices)
- Predefined templates of Groovy scripts. (Folder, Base Functions, Choices)
The available Publishers, Applications and Big Data may change according to your entitlements

Categories
Folder
The folder is used to group a set of rules into one branch which later can be moved, shared or disabled.
Publishers
With the Publishers you can publish the jobs coming from the connector and into a search engine, each publisher must be configure before it's added as a application rule. They are all downloadable java applications.
Applications
The Applications are used to modify the jobs coming from connector in a more complex way that a simple Groovy script could had done. They are all downloadable java applications.
Big Data
The Big Data category holds all the big data related applications such as Co-occurrence, Hadoop Job Launcher, among others.
Base Functions
The Base Functions are scripting rules base on Groovy that can do simple functions to the jobs, it also has rules that can skip or stop the process of a job in the workflow. You can also create your own custom rules.
Choices
The Choices are scripting rules base on Groovy that allow us to create branches in the workflow base on a decision, this branches are only be executed by the jobs that comply with the made decision.
Local Library
The Local Library category, holds all the rules used in the current workflow, even the shared rules used in the workflow. Dragging the rules from this category will just create a reference to the existent rule
Share Libraries
The Shared Libraries are sets of rules and applications we save to use with other content source, if a rule or application is not in a share rule, we can't used again in other content source.
How to Share a Rule or Application?
This section walks through the steps necessary to share any rule or application with the enabled menu.
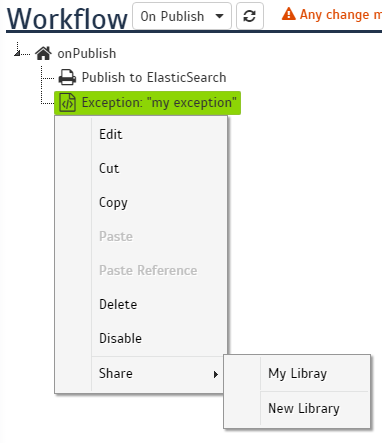
Step 1: Open the Context Menu
- Right click over the rule or application we want to share, if it can be shared, the Share option should be enabled.
- Put the mouse over the Share, this should open the sub menu
- Click the New Library option, this will open a window where we can put the name of the library.

Step 2: Create the Share Library
- Enter the name of the library
- Click on the Share button, this will create the share library with the rule or application inside of it.

Step 2.1: Check the Share Library
- Go to the Workflow Library, the new category Libraries should be visible by now.
- Click on Libraries category to show all the shared libraries available, your new library should be visible.
- Click on your library to show the shared rules in the library.
You can delete a shared rule by clicking on the trashcan next to the name of the rule in the Workflow Library
The share library may change position if we have several shared libraries, this is because is going to sorted by alphabetical order.

Step 3: Share to a existent Share Library
If you already have a share library and you want to add a new rule or application to it, repeat Step 1 and instead of clicking over New Library we can click over the name of our library, this will add the rule or application automatically.
Step 4: Unshare a Rule or Application
- Right click over the rule or application we want to unshare, if it is shared, the Unshare option should be enabled.
- Click the Unshare option, this will remove the rule from the shared library.

Workflow Trees
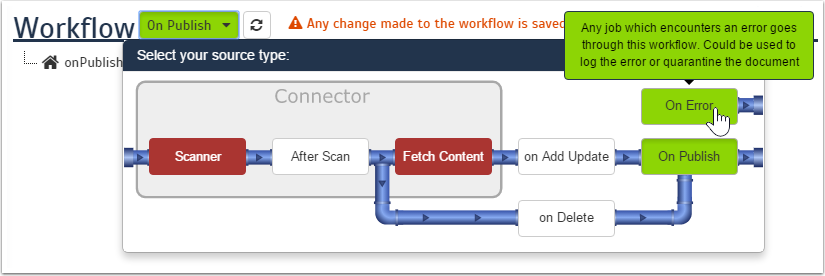
The Workflow Trees represent specific point in the information flow, they are stages in which the jobs are processed before they are sent to the next one. The root node of each tree is always going to be named as the stage it represents. We have 5 trees for the content source:
- After Scan:
- Process documents before their content is fetched. Typically used to terminate jobs to avoid fetching unwanted documents.
- On Add/Update:
- Process documents to be added or updated in the index. Typically used to map/normalize metadata fields and values.
- On Delete:
- Delete events go through this workflow. Typically empty, this can be used to update an external repository as well.
- On Error:
- Any job which encounters an error goes through this workflow. Could be used to log the error or quarantine the document.
- On Publish:
- Publish documents to a search engine. Put your publisher in this workflow.
* The workflow trees are saved with every change you made, they are independent from the Save button

Controls
The controls for the Workflow Tree are explained in the Admin UI Content Sources. But the most important control for the Workflow tree is the Tree Selection. With this control we can select the tree we want to modify, and we can see it in a representation of the information flow, also we can see the description of each tree just by putting the mouse over the button. The current tree will be highlighted in green
Rules Restrictions
For some rules there are some restrictions of which rule can contain which one, in the list below we can see which rules are containers of which types of rules.
- Root
- Folder
- Publishers
- Application Functions
- Basic Functions
- Choices (but not the Condition);
- Choices
- Condition (Only)
- Condition
- Choices
- Folder
- Exit (The only one from Basic Functions)
- Folder
- Folder
- Publishers
- Application Functions
- Basic Functions
- Choices (but not the Condition);
Add a rule or application to the Workflow Tree
This section walks through the steps necessary to add any rule or application to the Workflow Tree.
Step 1: Drag from the Library
You can add any rule or application just by dragging the rule from the Workflow Library and dropping it in the part of the Workflow Tree you want to put the rule or application.

Step 2: Fill the properties
If the rule needs to be configured, it will open a window with all the configuration properties, otherwise it just will appear in the tree. If a window is opened just, fill the necessary properties and click on the Add button to create the rule.

Step 2a: Update the properties
By double clicking the rule on the tree, we can open the window it the current properties of the rule. Then we can change the properties and save them by clicking on the Update button.
Context Menu
The Context Menu has several option to manage the business rules:
- Cut: Cuts the current rule.
- Copy: Copy the current rule.
- Paste: If it is pasting from a cut, it just paste the business rule, but if it is pasting from a copy it creates a new rule with the same properties.
- Paste Reference: (Enabled only after a copy) creates a reference to the rule we are coping. this means that if we change one the reference or the original rule, all the reference pointing to that rule will change.
- Delete: Deletes the reference to the rule, if the rule isn't in a Share Library it will also delete the rule.
- Disable/Enable: Disables or enables the current rule or reference, if the rule is disabled it will be gray and if the rule disabled is a parent, all the branch is inaccessible, this will be displayed as the children with a gray description but a black icon.
- Share: (Enabled if the rule isn't already shared) Opens a sub-menu with the options to share.
- New Library: Opens a window where you can specify the name of the new Share Library.
- Other Libraries: (If any) Displays the name of the existent Share Libraries where we can put the rule.
- Unshare: (Enabled if the rule is already shared) Removes the rule from the current Share Library

Workflow Rules and Application
For the Workflow we have added several scripting rules and applications that we can use. In this section we are going to explain all the new rules we introduce in Aspire 2.0.
Applications
The includes the Publishers, for which all related information can be found on this page, and the Application Functions that at the moment includes the Hierarchy Extractor and Mime Type Normalizer.
Custom Applications/ Publishers
By dragging and dropping the Custom option of publishers or applications, we will open a window where we can choose between two methods to install a custom application/publisher, repository and configuration files, both show as toggle buttons on the top of the window.
Repository
The repository method is always the default one, with this option we can download the custom application/publisher from a maven repository. To install the custom application/publisher with need to fill the following fields:
- 'Name: This will be the name of the application/publisher in the system, and it must be unique, otherwise, we will receive an alert indicating that the name is already in use.
- Description: This will be the description displayed in the tree and it will be the text which we will use to identify the application.
- Group ID: e.g. com.searchtechnologies.aspire
- Artifact ID: The id of the artifact representing the connector e.g. app-custom-connector
- Version: (Optional) If the version of the artifact isn't specify, Aspire will use the same version as it.

After got all the necessary fields, we click on continue and the application will be loaded in the same window.

* All the application/publisher added using this method will be added to their respective category in the Workflow Library.
** It is not recommended to use an older version of a connector is a new version is available.
Configuration Files
Before accessing the configuration file method an alert will be show indicating that the application/publisher added using this method are not going to be included in the respective category in the Workflow Library.

The configuration files method requires to have both application file and dxf file in the Aspire server. To install a custom application/publisher using this method we just have to specify the direction of the application file.

After got all the necessary fields, we click on continue and the application will be loaded in the same window.
* If the dxf file doesn't have the new valid format for application/publisher, it won't be possible to configure the application/publisher.
Overview
Content Tools