Install Maven Command Line
If you are running Aspire with the Quick-Start Distribution from the aspire binaries, you can skip this part, otherwise If you are using the Maven Archetype for downloading Aspire you must follow this section.
Installing the Maven command line is a very useful way to work with Maven and projects, especially for distributions, or when you're having trouble with m2eclipse (which happens now and then).
- Download and install the latest version of Apache Maven: http://maven.apache.org/download.html
- Download the compressed binary files.
- Suggestion: Create a "C:\dev" directory and unpack the files there.
- "C:\dev" is a good place to store open source tools like Apache Maven, since (on rare occasions) they will not work with path names that have spaces in them.
- Add the M2_HOME and M2 environment variables in your System Properties and modify your Path variable:
- Please refer to Step 1 above for the instructions on accessing your Environment Variables via the Control Panel.
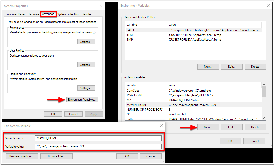
- Add the M2_HOME system variable:
- In the System Variables section, click on "New..."
- Enter the following in the "Variable name:" field: M2_HOME
- Locate the directory within your Program files where you unpacked Maven, enter this directory name as the "Variable value:" (for example, C:\dev\apache-maven-3.3.9), then click on the OK button.
- Add the M2 system variable:
- In the System Variables section, again click on "New..."
- Enter the following in the "Variable name:" field: M2
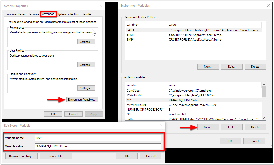
- In the "Variable value:" field, enter the following, then click on the OK button: %M2_HOME%\bin
- Modify your Path variable:
- Scroll through the System Variables to locate the Path variable, select it, then click on the Edit button.
- Click in the "Variable Value" field to activate it, then press your End key to move your cursor to the end of the value.
Without typing any spaces, enter the the "bin" directory from Apache Maven to your environment path (for example, ;C:\dev\apache-maven-3.3.9\bin), then click on the OK button.
- Click on the OK button to close the Environment Variables window, then click on the OK button to close the System Properties window.
- Test that you can access Maven.
- Open up a new DOS command-shell (go to the Start menu, enter "cmd" in the "Run" or "Search for Programs" field, and then execute the cmd.exe program).
At the prompt, enter the following, then press the Enter key: mvn -version
Success is indicated when version information is returned, as shown in the image to the right.
> mvn -version
  Apache Maven 3.3.9 (bb52d8502b132ec0a5a3f4c09453c07478323dc5; 2015-11-10T10:41:47-06:00)
  Maven home: C:\dev\apache-maven-3.3.9\bin\..
  Java version: 1.7.0_79
  Java home: C:\dev\jdk1.7.0_79\jre
  Default locale: en_US, platform encoding: Cp1252
  OS name: "windows 10", version: "10.0", arch: "amd64", family: "dos"
- Configure your
.m2/settings.xmlfile to point to the Search Technologies repository. See Connect to Search Technologies Maven Repository
Connect to Search Technologies Maven Repository
The easiest method for creating new components and new distributions with Aspire is to use the Search Technologies Maven repository for Aspire.
The Maven repository is available from the following URL:
You will need to register with with Search Technologies before you can connect up to the Search Technologies Maven repository.
In order to use the Maven repository (either within Eclipse or on the command), you will need to add the following to your Maven settings file. There are two possible locations for the maven settings file:
- A user's install: ${user.home}/.m2/settings.xml
- These are the user-specific settings (which only affect a single user).
- For Windows users, this will typically be under:
- Windows 7 and up: C:\Users\{username}\.m2
- Windows XP: C:\Documents and Settings\{username}\.m2
- The Maven install: $M2_HOME/conf/settings.xml
- This is the global settings file which affect all users on the machine. For most people, M2_HOME will be where you installed the maven command-line program.
Probably the user-specific version is safer and is most likely to be picked up by both the Maven command line and Maven for Eclipse.
Once you have registered, use your registered username and password to replace "REGISTERED-USERNAME" and "REGISTERED-PASSWORD" below.
For this process we assume the user has created the M2_HOME, to see how to create the M2_HOME please go to Install Maven Command Line
<?xml version="1.0" encoding="UTF-8"?>
<!--
  ********************************************************************************************
  **
  ** Copyright Search Technologies 2016
  **
  **~~~~~~~~~~~~~~~~~~~~~~~~~~~~~~~~~~~~~~~~~~~~~~~~~~~~~~~~~~~~~~~~~~~~~~~~~~~~~~~~~~~~~~~~~~
  **
  ** Aspire Maven settings.xml
  **
  ** This file is configured by default to run in "public" mode, connecting to
  ** https://repository.searchtechnologies.com/artifactory/public
  **
  ** There are two profiles:
  **
  ** server:   sets the stRepositoryServer variable (used in all urls) to point to the main
  **           Artifactory server (default)
  **
  ** public:   sets the repository url to ${stRepositoryServer}/artifactory/public
  **           This is the main (default) profile for general use. The public repository
  **           covers the release repository and the "stable" snapshots
-->
<settings>
  <servers>
    <server>
      <id>stPublic</id>
      <username>REGISTERED-USERNAME</username>
      <password>REGISTERED-PASSWORD</password>
    </server>
  </servers>
  <profiles>
    <profile>
      <id>server</id>
      <activation>
        <activeByDefault>true</activeByDefault>
      </activation>
      <properties>
        <!-- Search Technologies' Artifactory server -->
        <stRepositoryServer>https://repository.searchtechnologies.com</stRepositoryServer>
      </properties>
    </profile>
    <profile>
      <id>public</id>
      <activation>
        <activeByDefault>true</activeByDefault>
      </activation>
      <properties>
        <!-- Artifactory URL -->
        <stPublicUrl>${stRepositoryServer}/artifactory/public</stPublicUrl>
      </properties>
      <repositories>
        <repository>
          <id>stPublic</id>
          <url>${stRepositoryServer}/artifactory/public</url>
          <snapshots>
            <enabled>true</enabled>
            <updatePolicy>always</updatePolicy>
          </snapshots>
          <releases>
            <enabled>true</enabled>
            <updatePolicy>always</updatePolicy>
          </releases>
        </repository>
        <repository>
          <id>cloudera</id>
          <url>https://repository.cloudera.com/artifactory/cloudera-repos</url>
        </repository>
      </repositories>
    </profile>
  </profiles>
</settings>
Overview
Content Tools