2. Browse to: http://localhost:50505.
For details on using the Aspire Content Source Management page, please refer to Admin UI.

Step 2. Add a New StageR Content Source.
To specify exactly what shared folder to crawl, we will need to create a new "Content Source".
- From the Content Source, click Add Source.
- Click StageR Connector.

Step 2a. Specify basic information
In the General tab in the Content Source Configuration window, specify basic information for the content source:
- Enter a content source name in the "Name" field.
- This is any useful name which you decide is a good name for the source. It will be displayed in the content source page, in error messages, etc.
- Click on the Scheduled pull-down list and select one of the following: Manually, Periodically, Daily, Weekly or Advanced.
- Aspire can automatically schedule content sources to be crawled on a set schedule, such as once a day, several times a week, or periodically (every N minutes or hours).For the purposes of this tutorial, you may want to select Manually and then set up a regular crawling schedule later.
- Click on the Action pull-down list to select one of the following: Start, Stop, Pause, or Resume.
- This is the action that will be performed for that specific schedule.
- Click on the Crawl pull-down list and select one of the following: Incremental, Full, Real Time, or Cache Groups.
- This will be the type of crawl to execute for that specific schedule.
- This will be the type of crawl to execute for that specific schedule.
- After selecting a Scheduled, specify the details, if applicable:
- Manually: No additional options.
- Periodically: Specify the "Run every:" options by entering the number of "hours" and "minutes."
- Daily: Specify the "Start time:" by clicking on the hours and minutes drop-down lists and selecting options.
- Weekly: Specify the "Start time:" by clicking on the hours and minutes drop-down lists and selecting options, then clicking on the day checkboxes to specify days of the week to run the crawl.
- Advanced: Enter a custom CRON Expression (e.g. 0 0 0 ? * *)
You can add more schedules by clicking Add New, and rearranging the order of the schedules.
If you want to disable the content source just clear the the Enable check box. This is useful if the folder will be under maintenance and no crawls are wanted during that period of time.
Real Time and Cache Groups crawl will be available depending of the connector.

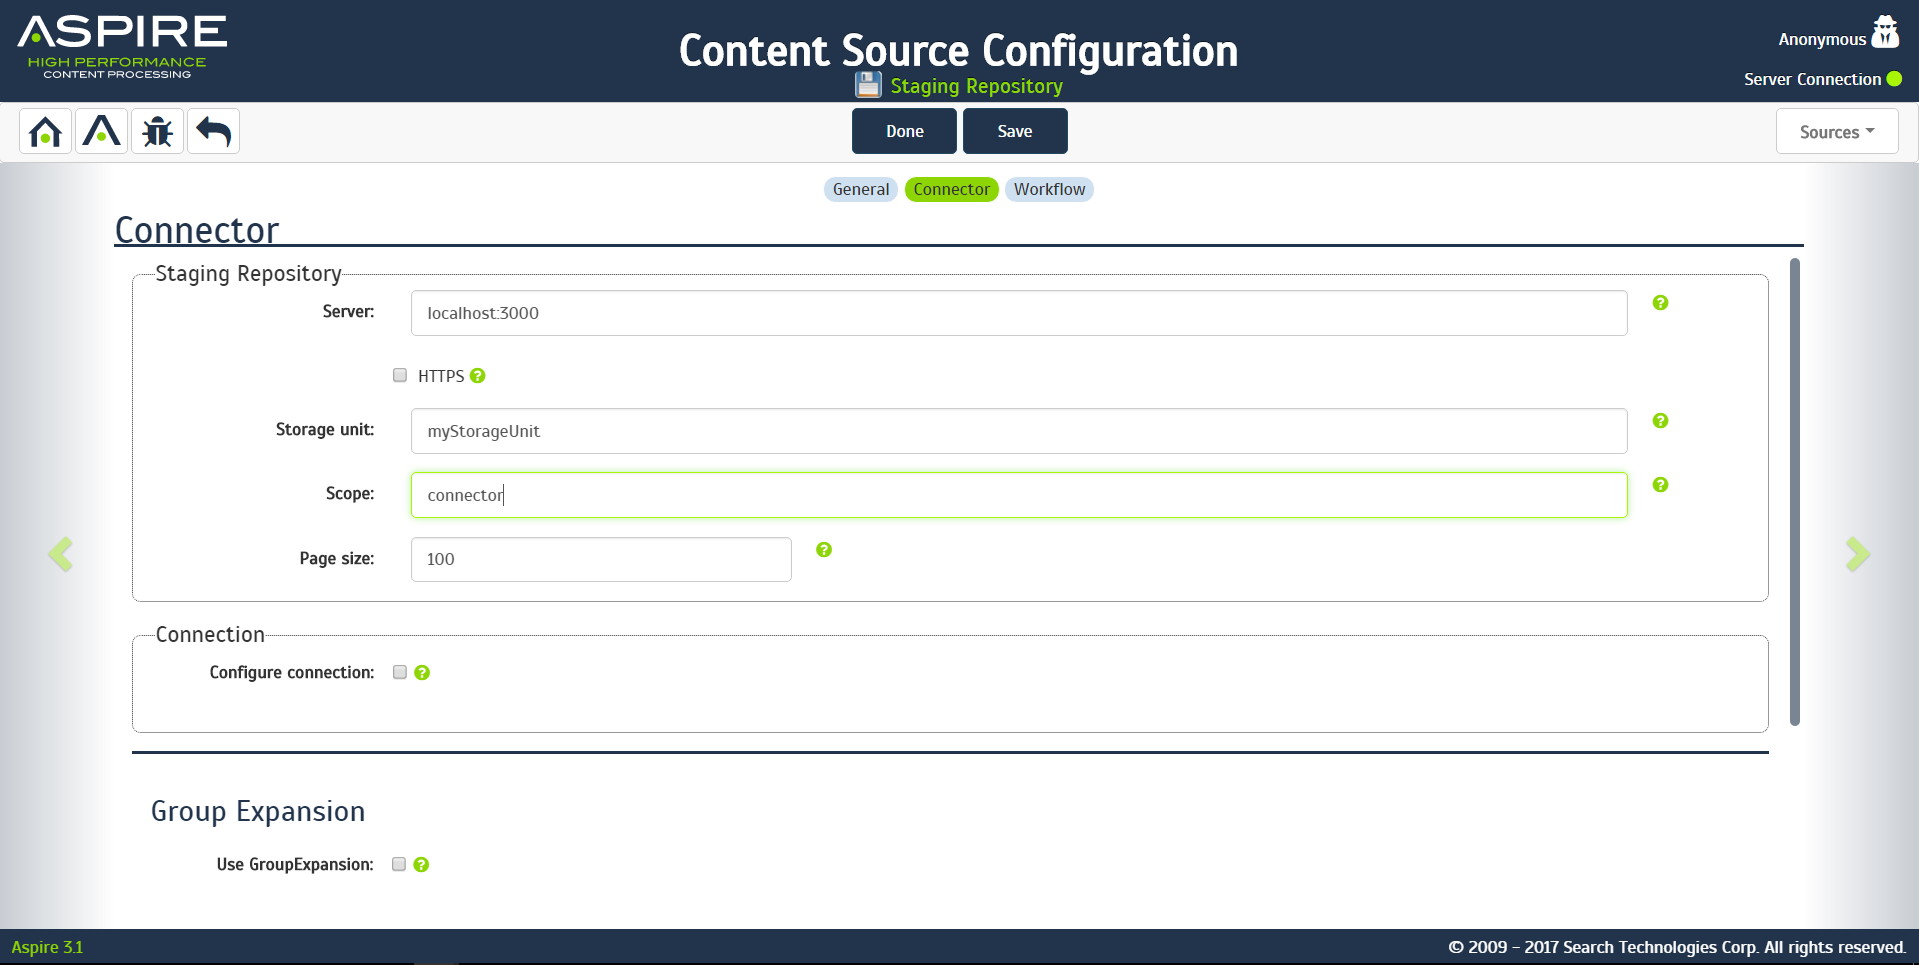
Step 2b. Specify the connector information
In the Connector tab, specify the connection information to crawl the StageR.
- Server
- The host and port of the server the STageR is running on
- The STageR's default port is 3000
- The host and port of the server the STageR is running on
- Use https
- Check this box if your STageR requires an https connection
- Storage Unit
- The name of the STageR storage unit you wish to crawl
- Scope
- The scope with in the STageR's storage unit you wish to crawl
- Page size
- The number of transactions to retrieve from the STageR in a single call
- Server
If required, you can also configure the connection to the STageR. Check the configure connection check box to allow you to configure:
- Connection timeout
- Period to attempt to connect to the STageR for before timing out
- Read timeout
- Period to attempt to read from the STageR for before timing out
- Period to attempt to read from the STageR for before timing out
- Retries
- The number of retries that will be attempted when a connection or read timeout occurs before the STageR reports an error
- Retry delay
- The period to wait after a failure before retrying the operation
- Retry policy
- Fixed
- The same delay will apply on each retry
- Increasing
- The delay will be the attempt number multiplied by a fixed value
- eg for a value of 2, the delay would be 2, 4, 6, 8 etc
- A maximum delay can be specified
- The delay will be the attempt number multiplied by a fixed value
- Cumulative
- The delay will be increased by a multiple on each attempt
- eg for a delay of 3 and a multiplier of 2, the delay would be 3, 3x2, 3x2x2, 3x2x2x2 (3, 6, 12, 24) etc
- A maximum delay can be specified
- The delay will be increased by a multiple on each attempt
- Fixed
- Connection timeout

Step 2c. Specify workflow information.
In the Workflow tab, specify the workflow steps for the jobs that come out of the crawl. Drag and drop rules to determine which steps should an item follow after being crawled. These rules could be where to publish the document or transformations needed on the data before sending it to a search engine. See Workflow for more information.
- For the purpose of this tutorial, drag and drop the Publish To File rule found under the Publishers tab to the onPublish Workflow tree.
- Specify a Name and Description for the Publisher.
- Click Add.
- Click Save and Done and you'll be sent back to the Home page.
- For the purpose of this tutorial, drag and drop the Publish To File rule found under the Publishers tab to the onPublish Workflow tree.
Overview
Content Tools